Agenda
- Introduction
- Route
- Operations
- Route Networks
- Route Operation Parameters
- Times Consumed by Operation
- Cost of Operation
- How Operations are Treated in Microsoft Dynamics AX
- Summary
Introduction
In this training lesson, we will learn how to set up route and operations and what they are used for.
A route or a production route in Microsoft Dynamics AX brings together a sequence of steps or operations which defines a manufacturing process. Like a production BOM, a route must be approved before it is used in a live production order and must also be marked as active.
An operation within a route is attached to a specific work center, which defines a person, machine, tool, or vendor who is to carry out the work.
A route can be defined and attached to more than one item in the same way that an operation can be defined and attached to more than one route. In this way a company can build up a library of operations which may be reused on many routes.
The following examples demonstrate the principle:
| Route : 0010 – Fairy Cake | |||
| Operation Number | Description | Work Center | Run Time |
| 10 | Mix | Food processor | 120 seconds |
| 20 | Bake | Oven | 45 minutes |
| Route : 0020 – Fruit Cake | |||
| Operation Number | Description | Work Center | Run Time |
| 10 | Soak Fruit | Sink | 12 hours |
| 20 | Mix | Food processor | 600 seconds |
| 30 | Bake | Oven | 60 minutes |
Notice that both previously mentioned production routes contain the same operations attached to the same work centers and only the run time differs.
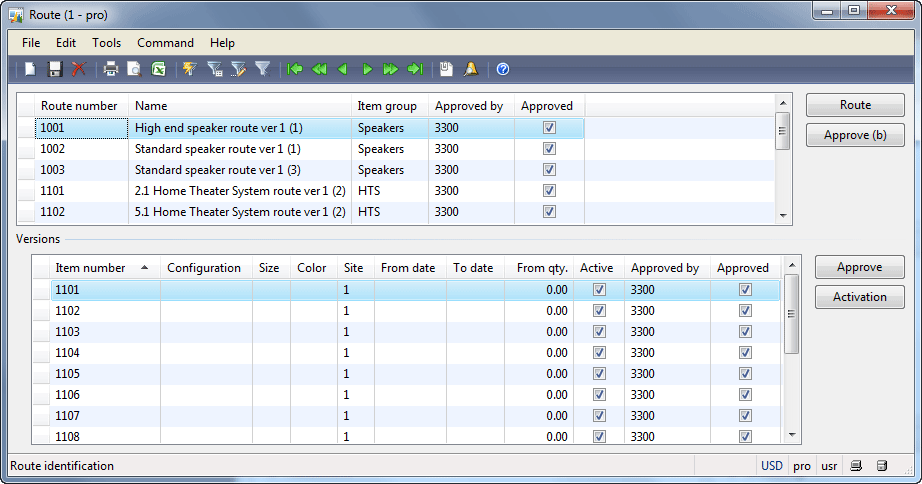
Route
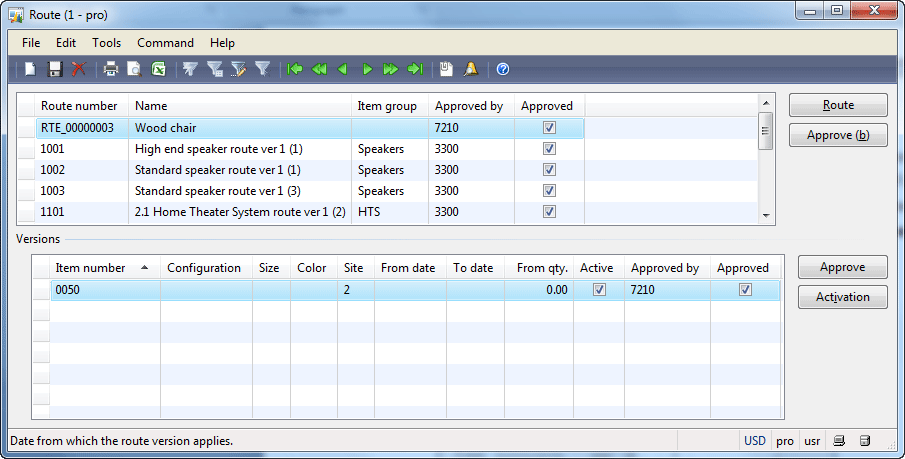
Let’s create a new route for the Chair item:
- Go to Production > CommonForms > RouteDetails. The Route form opens.
- In the header area, create a new line and set the Name field to Wooden chair. The Item group field is used for convenience – when the user will assign a BOM to the route, BOMs from the item group will be shown first.
- In the Versions area, create a new line with the following values: Item number = 0050, Site =2. We make sure that the route can be assigned to different items. For example, if different types of chair are produced in one way but have different number of components, they can be assigned to one route.
- In the Versions area, click the Approve button. In the Approve version form, select the employee and select the Approve route check box, and then click OK.
- In the Versions area, click the Activation button.
- The Route form will have the following view:
Note: A route only contains operations and does not depend on BOM components. But, operation parameters can be set up per BOM. In other words, if a chair and a fishing rod use the same route, then the operations to process these BOMs are the same but can consume different time.
Operations
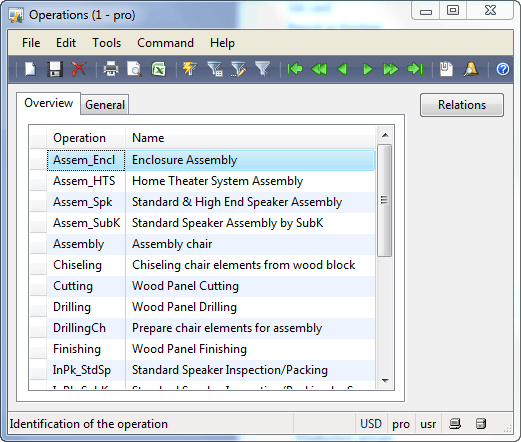
An operation is a task or a process connected with the production of an item. To set up operations, go to Production > Setup > Routes > Operations. The Operations form opens.
As you can make sure, the Operations form contains only two parameters: Operation (operation identification) and Name (short description).
That is because an operation can be assigned to different work centers. So, an operation can consume different time in different work centers. For example it takes one hour to paint 4 chairs in one work center, while in the other work center the same operation consumes 2 hours (because the number of workers differs). So the Operations form can’t have multiple parameters because they vary from one work center to another.
When an operation is assigned to a route, the route operation (or an operation with parameters) is created. All route operation parameters are filled in by default from the work center. In the previous training lesson, we have discussed what work center parameters are the default ones for an operation.
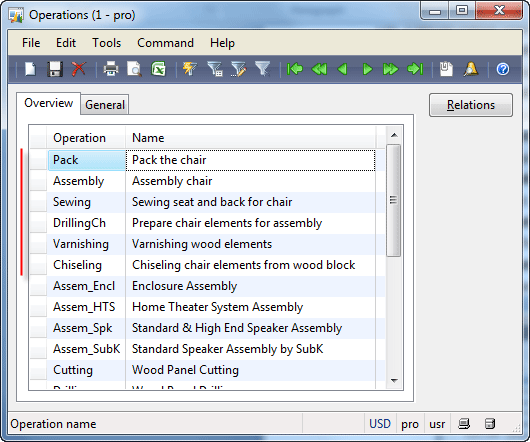
Let’s imagine the following chair production process: chiseling chair elements from wooden block (chiseling), varnishing all wooden elements (varnishing), preparing chair elements for assembly (drilling), sewing seat and back for a chair (sewing), assembling a chair (assembly), and packing a chair (pack)
Let’s set up these operations in Microsoft Dynamics AX:
- In the Operations form, create the first line with the following parameters: Operation = Chiseling, Name = “Chiseling chair elements from wooden block”. Save the line.
- Create the second line with the following parameters: Operation = Varnishing, Name = “Varnishing wooden elements”. Save the line.
- Create the third line with the following parameters: Operation = DrillingCh, Name = “Preparing chair elements for assembly”. Save the line.
- Create the forth line with the following parameters: Operation = Sewing, Name = “Sewing seat and back for a chair”. Save the line.
- Create the fifth line with the following parameters: Operation = Assembly, Name = “Assembling chair”. Save the line.
- Create the sixth line with the following parameters: Operation = Pack, Name = “Packing a chair”. Save the line. The Operations form will have the following view:
Now, we can create the route operations:
- Open the Route form. Go to Production > CommonForms > RouteDetails.
- Find the route for the 0050 chair item and click the Route button. The Route form opens. This form is used for creating route operations.
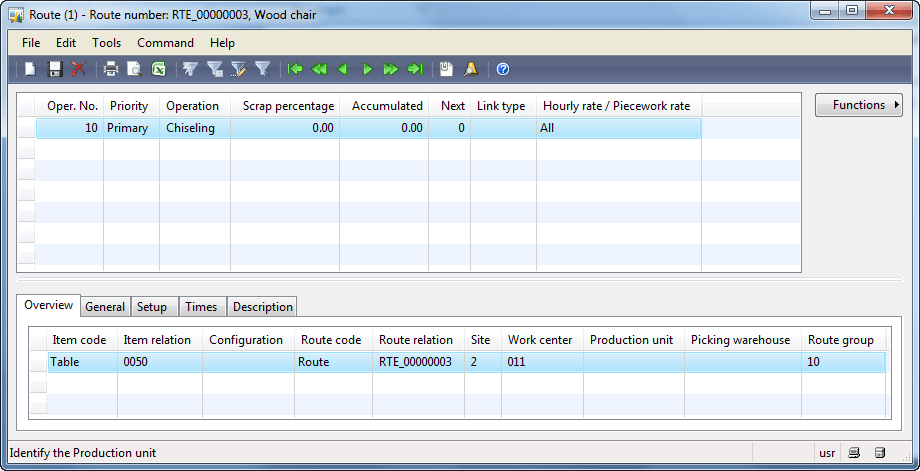
- Create a new route operation line. In the upper area, create a new line with the following parameters: Oper.No. = 10, Operation = Chiseling. Save the line.
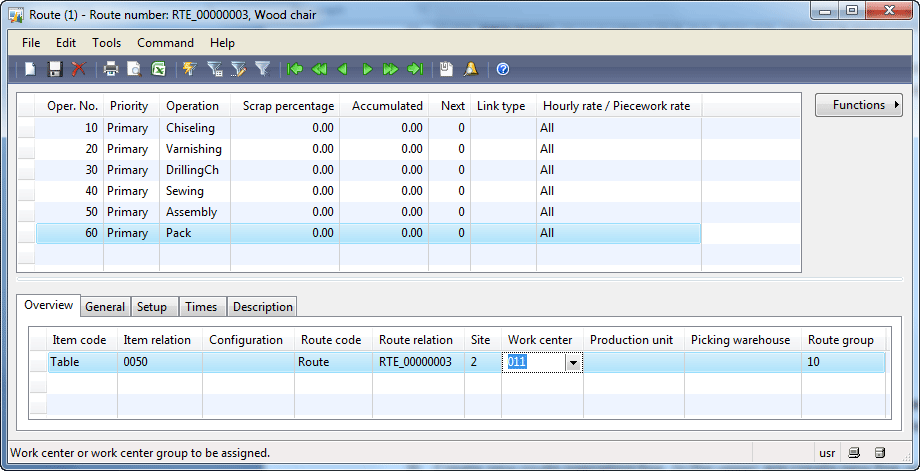
- Create route operation parameters. In the bottom area, create a new line with the following parameters: Item code = Table, Item relation = 0050, Site = 2, Work center = 011. When the work center is selected, all operation parameters are filled in from the selected work center.
Make sure that the Setup and Times tabs contain the same values as the Setup and Times tabs in the work center. The route operation parameters can be changed. Note: Operation parameters can be set up per BOM item.
- Create all other operations and assign them to the 011 work center (repeat the same step as for the first operation). The Route form will have the following view:
Note: When several route operations are assigned to the same work center, all operation parameters are the same. So, time required for assembling one chair and time required for sewing one chair is the same.
Route Networks
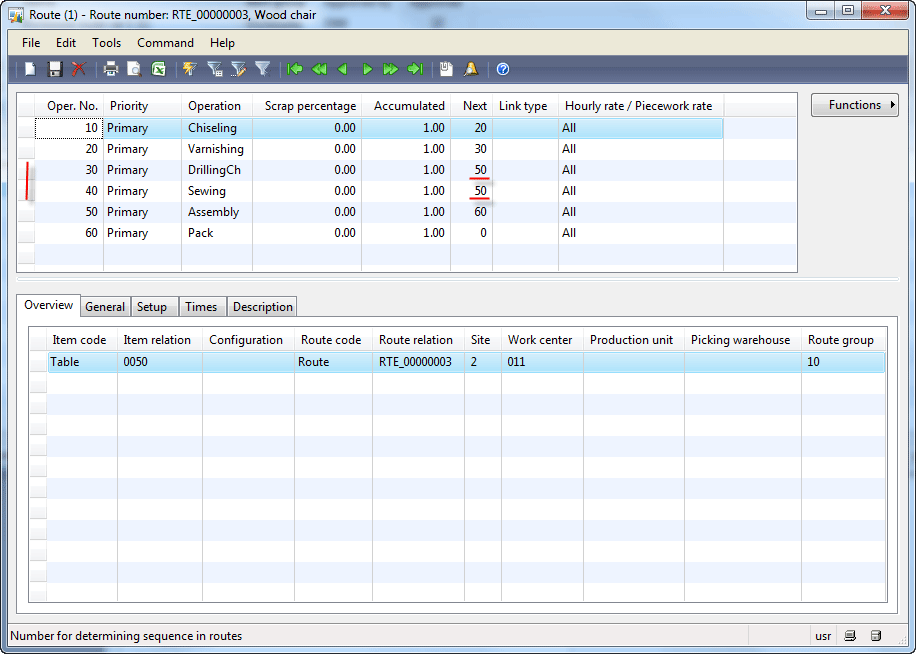
If you close the Route form, the “There is more than one closing operation” error message will be shown. Operations in a route must be attached to each other in a logical way to reflect the production process. The operation in a route is identified by an operation number (the Oper. No field) and is linked with the help of the Next field.
Let’s create the simplest production flow in the Route form:
- Find the Chiseling operation and fill in 20 in the Next field.
- Find the Varnishing operation and fill in 30 in the Next field.
- Find the DrillingCh operation and fill in 40 in the Next field.
- Find the Sewing operation and fill in 50 in the Next field.
- Find the Assembly operation and fill in 60 in the Next field.
It is the easiest route network, because each operation goes step by step. The real production process can have a complex network. The Microsoft Dynamics AX allows creating the following operation constructions:
- Independent operations. In this case, operations are started independently. The following picture from the Microsoft Production training illustrates this structure:
- Simultaneous operations.
But, these operation structures can be created only when the Route network check box is selected in the Parameters form (Production > Setup > Parameters > Routes field group > Route network check box).
Note: When the Route form closes, the route is updated. Actually the user can set up a complex structure (with an independent operation and simultaneous operations) with the Route network check box cleared, but when the user closes the Rote form, the structure will be updated to a simple “step by step” network.
Let’s create an independent operation structure for the Sewing operations, so that workers can start sewing backs or seats for chairs independently from wooden components: Find the DrillingCh operation in the Route form and fill in 50 in the Next field.
Several words about simultaneous operations: they can be used in both simple and complex route networks. A simultaneous operation is a process where several work centers are used at the same time. Simultaneous operations use the capacity of several work centers at the same time, for example, they can use a machine, its operator, and possibly a specific tool. To set up simultaneous operations, you must use the same operation number and the Priority field.
Let’s assume that the Chiseling operation uses the human and the machine work:
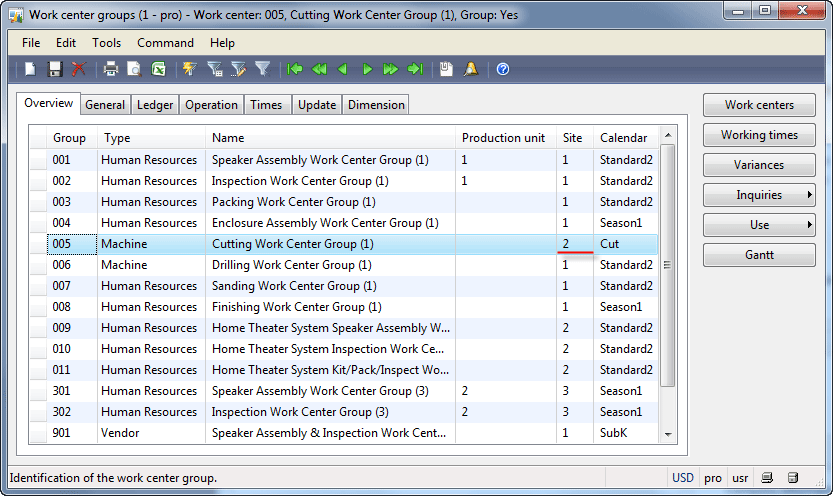
- Since we have set up the Chair route for the site 2, we should create a machine work center in this site. Go to Basic > CommonForms > Workcentergroups. The Workcentergroups form opens. We will change the site for the available machine work center group. Find the 005 Cutting Work Center Group (1) and change the Site field vale from 1 to 2. The warning message “The change of Production unit and/or Site takes effect on orders only after a rescheduling is run.” will be shown.
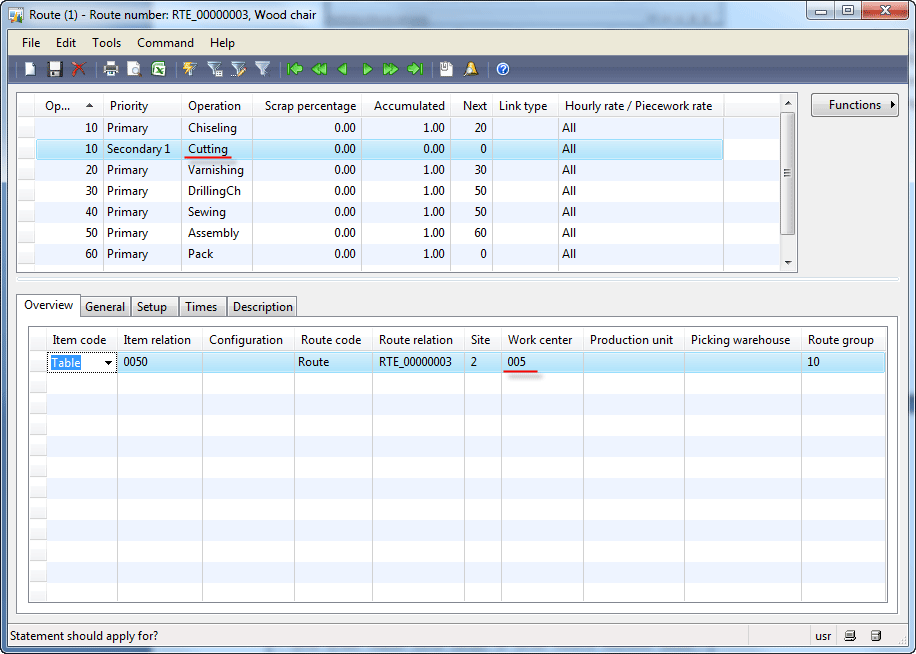
- Go back to the Route form and create a new line for the simultaneous operation with the following input: Oper.No = 10, Priority = Secondary1, Operation = Cutting. Note that the simultaneous operation must have a different name (Chiseling – human work and Cutting – machine work), which to my mind is not convenient. Save the line.
- Assign a machine work center. On the Overview tab, create a new line with the following values: Item code = Table, Item relation = 0050, Site = 2, Work center = 005. Save the line.
When a production order is scheduled, the operation parameters from the primary simultaneous operations are taken into account. All other simultaneous operations are secondary, therefore their capacity is not taken into consideration. We will check how it works in the Times consumed by operation section of this training lesson.
Route Operation Parameters
Most of the operation parameters are transferred from a work center the topic that we have already discussed shortly in the previous training lesson.
The main operation parameters are:
- Time consumed for performing operations on BOM items
- Cost of the operation
- How operations is treated in Microsoft Dynamics AX
In this paragraph, we will discuss these operation parameters in more detail.
Times Consumed by Operation
In Microsoft Dynamics AX, an operation can be divided into the following parts: Queue before, Setup, Process, Overlap, Transport, Queue after. These parts are called Jobs. Each job is a separate logical unit. Jobs are assigned to employees for processing.
Let’s assume that the Varnishing operation has the following jobs: Setup, Process, and Queue after.
Let’s set up the time required for these operation jobs:
- Open the Route form. Find the created Wood chair route. Click the Route button. The Route form opens. In the Route form, find the Varnishing operation.
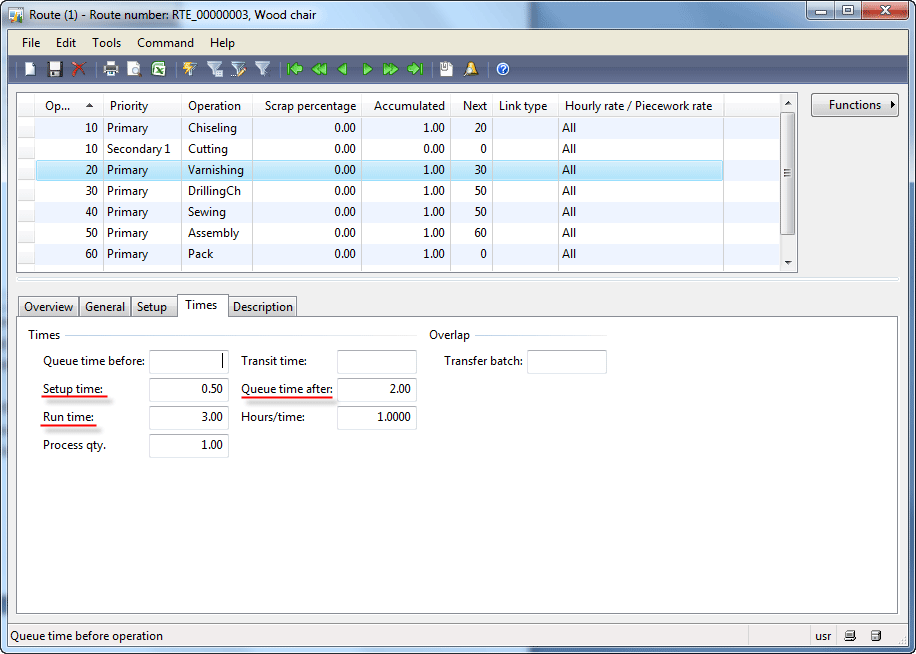
- Go to the Times tab and fill in the following values: Setup time = 0.5, Run time = 3, Queue time after = 2. The Time tab will have the following view:
This means that the 011 work center requires 0.5 hr (for preparing a working place) + 3 hrs (for varnishing) + 2 hrs (for drying) = 5.5 hours for varnishing one BOM item. Note that only the run time is quantity dependent. This means that for varnishing two BOMs the 011 work center requires 0.5 hr (for preparing a working place) + 3 hrs * 2 (for varnishing) + 2 hrs (for drying) = 7.5 hours.
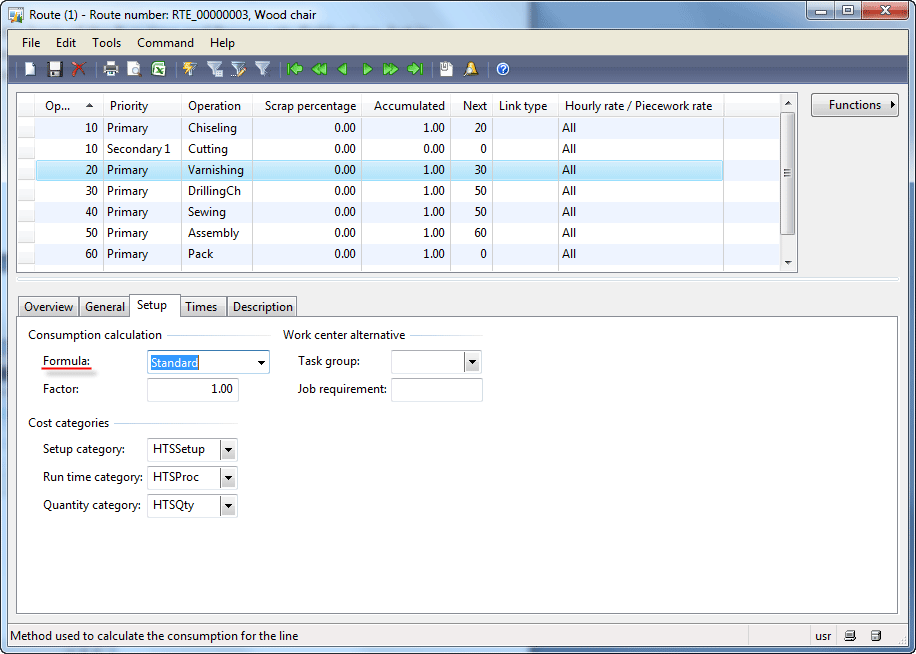
We have calculated the process time (the run time) on the basis of the values from the Run time and Process qty fields, but in Microsoft Dynamics AX the process time required for processing job for one BOM item can be calculated in four different ways. It depends on the operation formula parameter which located under Route form > Setup tab > Consumption calculation field group> Formula field.
The Formula field has the following values:
- Standard: Process time = Run time / Process quantity. For example, in our case the 011 work center requires 3(Run time field value) / 1 (Process qty. field vale) = 3 hours for process job (run job).
- Capacity: Process time = 1 / (Capacity / Factor). In this formula, the run time always equals to 1 hour. The capacity value is taken from a work center (Basic > Common Forms > Work center groups > General tab > Capacity field group > Capacity field). The factor value is taken from the operation factor parameter (Route form > Setup tab > Factor field, see the previous image).
- Batch: Process time = (Run time / Process quantity) * Produced quantity. As we can see, this is the standard formula multiplied by the produced quantity; produced quantity is taken from a production order. Actually, I can’t imagine what this formula can be used for, because it should return the consumed run time per one BOM.
- Work center batch: Process time = (Run time / (Batch capacity / Factor))* Produced quantity
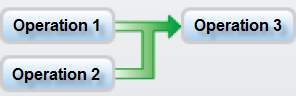
A route can have a complex network with independent and simultaneous operations (as described in previous topic). Let’s assume that a route has the following network:
Time consumed by Operation 1 and Operation 2 can be different. But, what if the production process requires that these two operations end or start at the same time? Unfortunately, in Microsoft Dynamics AX the user cannot set up relations between independent operations.
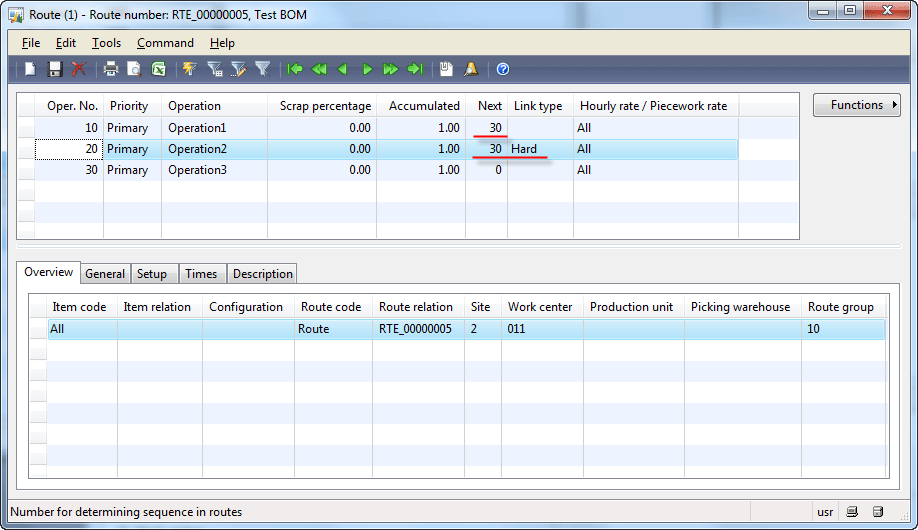
By default, Operation 3 will start after the longest previous operation ends, or in other word when all previous operations end. We can change the default flow. For example if Operation 1 will run 3 hours and Operation 2 will run 1 hour, we can set up Operation 3 to start when Operation 2 ends (the smallest operation). It is difficult to assume when this flow can be used. For this purposes, the Link type field is available in the Route form. If Operatin3 must start when Operation2 ends, the route should have the following link type values:
Note: In a simple route, a network operation always starts after the previous operation ends.
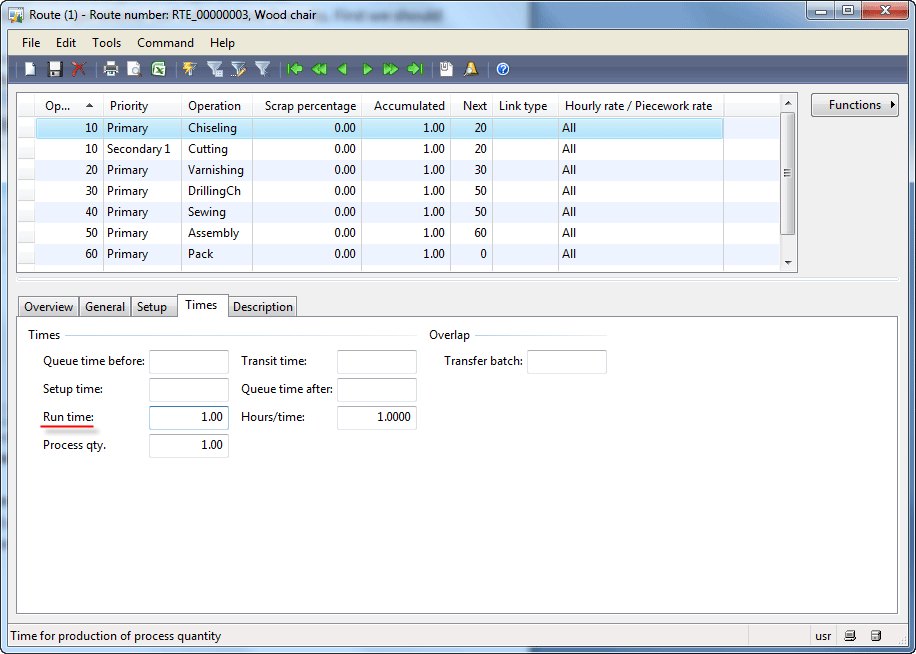
In our example, we have both independent and simultaneous operations. Let’s check how this works. First, we should set up the run time for all route operations:
- In the Route form, select the Chiseling operation.
- Go to the Times tab and fill in 1 in the Run time field.
- Repeat the same set up for all operations except the Varnishing operation, because we have already set up time for this operation.
Then, we will create a production order and run the job scheduling:
- Go to Production > CommonForms > ProductionOrderDetails. The Production orders form opens.
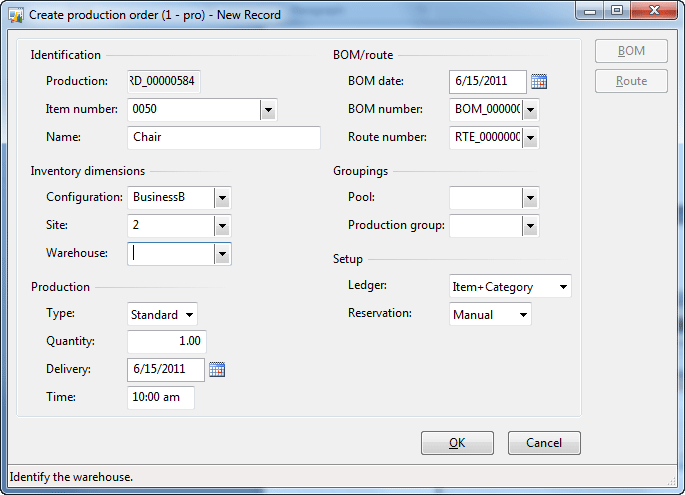
- Create a new line. The Create production order form opens. In the Itemnumber field select item number 0050 (Chair), in the Configuration field select the BusinessB value, in the Site field select the value 2 (transfer the route and the BOM from the active version). Make sure that the Quantity field is set to 1.
Click OK.
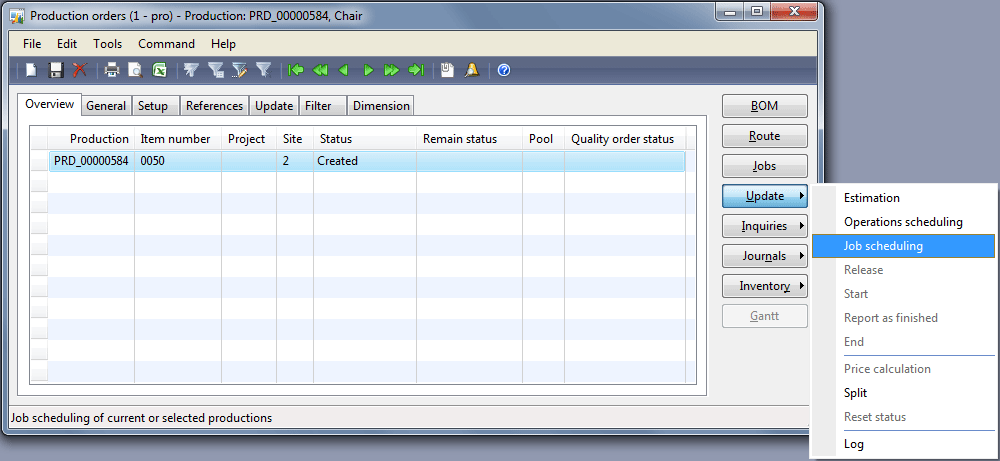
- The new production order will be created. Click the Update > Job scheduling menu button.
We will learn the Production order life cycle in the next training lesson.
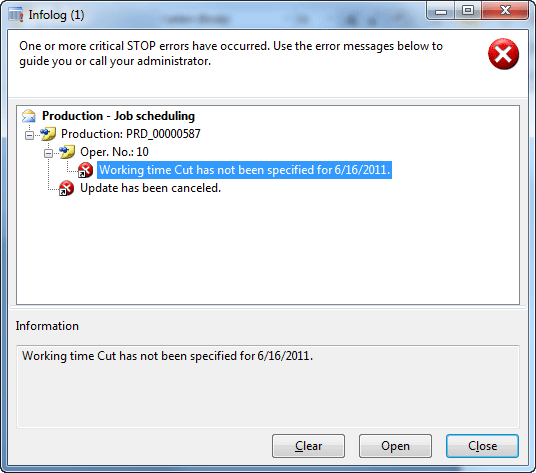
- The Job scheduling form opens. Click OK. As a result, I have received the “Working time Cut has not been specified for 6/16/2011” error message:
This is because the Cutting operation is performed in the 005 machine work center group. This group uses the Cut calendar. All that you need to do is to create working time for the Cut calendar by going to Basic > CommonForms > Calendar > finding the Cut calendar > clicking the Workingtimes button > clicking the Composeworkingtimes button > selecting the Std-Day working time template, and then clicking OK.
- Run the Job scheduling process once again. In the Productionorders form, click the Update > Jobscheduling button. The Job scheduling form opens. Click OK. As a result, I have received the “Working time Standard has not been specified for 6/16/2011” error message. This is because during the job scheduling process, master planning transactions are created. Master planning uses the Standard calendar (Master planning > Setup > Parameters > General tab > Update field group > Today’scalendardate field) that doesn’t have the working time. All that you need to do is to create working time for the Standard calendar by going to Basic > CommonForms > Calendar > finding the Standard calendar > clicking the Workingtimes button > clicking the Composeworkingtimes button > selecting the Std-Day working time template, and then clicking OK.
- Run the job scheduling process once again. In the Productionorders form, click the Update > Jobscheduling button. The Job scheduling form opens. Click OK. The job is executed correctly.
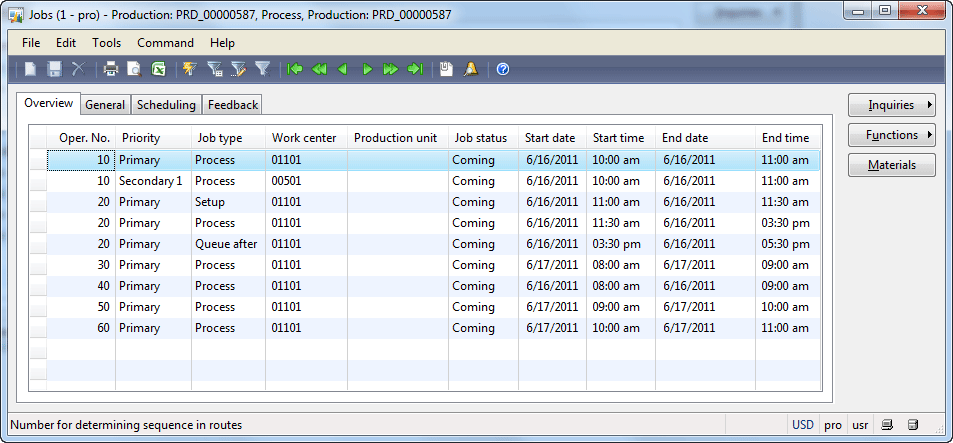
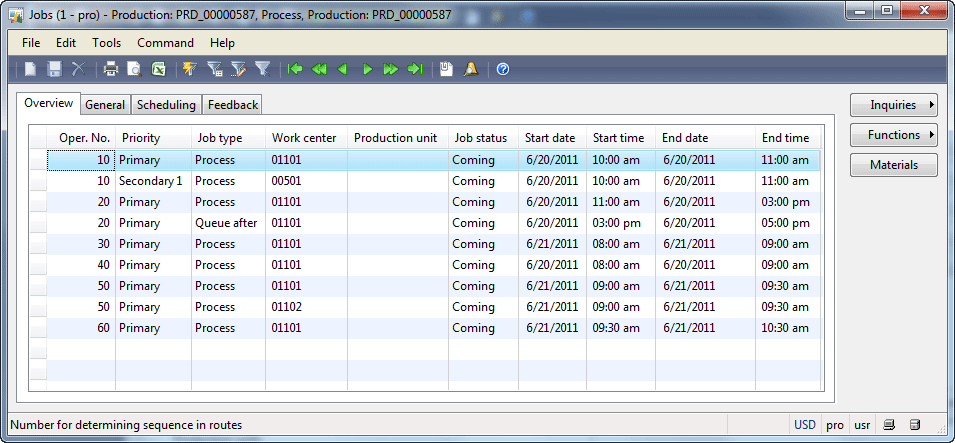
- To check the process result in the Productionorder form, click the Jobs button. The Jobs form opens.
We can see the operations are divided into jobs. The operation 20 is divided to Setup, Process, and Queue after jobs, this is because we have set up the time for this operation parts. The operation 40 is an independent operation and we can see that the generated job starts on 8:00 A.M. 6/16/2011 (independent from other jobs). Simultaneous operations generate simultaneous jobs that start and end at the same time (Oper.No 10). The time consumed by simultaneous jobs is calculated on the basis of primary simultaneous operation parameters. For convenience, the visual view of operations and jobs is available in Microsoft Dynamics AX. In the Production orders form, click the Gantt button. The Gantt chart form opens. Expand work centers and you will see the following picture:
We can see that jobs consume some time from the work center. Microsoft Dynamics AX uses an available work center from a work center group specified on the operation.
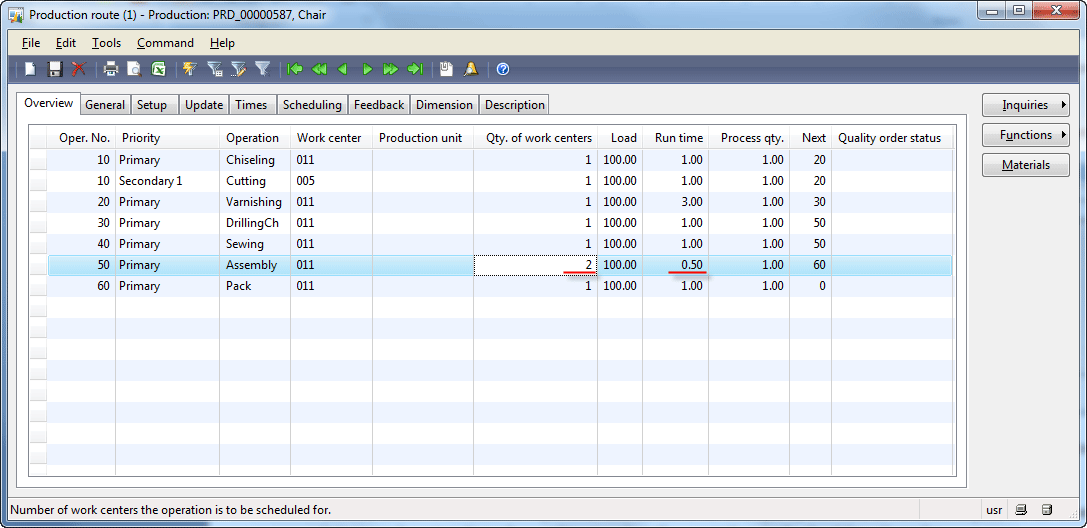
One more parameter that influences the time consumed by an operation is the Qty. of work centers which located on the General tab of the Route form). If this field contains, for example, the value 2, two simultaneous jobs will be created in two work centers. It can be used to speed up the operation. Let’s check how it works:
- Since the production order already exists, we can change the operation parameter for this order. In the Production orders form, click the Route button. The Production route form opens.
- For example, we want to speed up the Assembling operation. Find this operation in the Productionroute form, and change the number of work centers from 1 to 2. The dialog box opens offering the user to change the time, click OK.
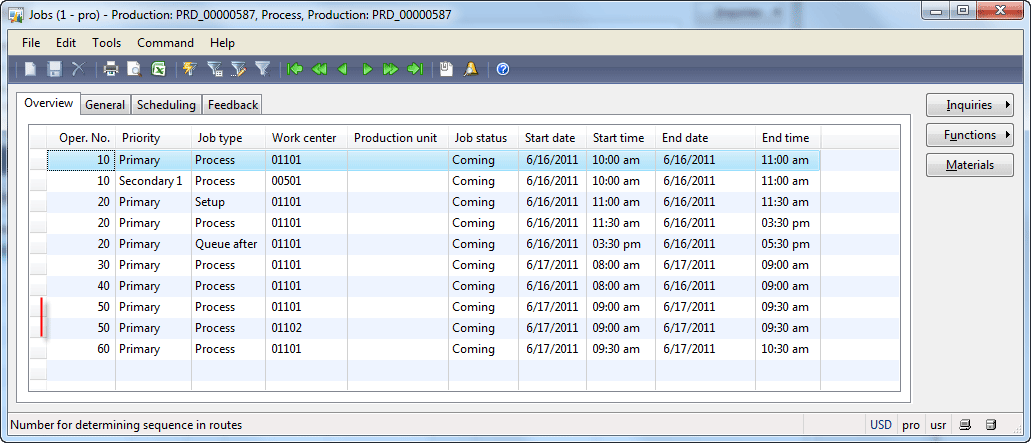
- Close the form and run the job scheduling process. In the Production orders form, click the Update > Jobscheduling button. The Job scheduling form opens. Click OK.
- To check the job scheduling results, click the Jobs button in the Production orders form. The Jobs form opens. We can see that two jobs for Operation 50 are created. As a result Operation 50 starts at 9:00 and ends at 9:30. In this way we speed up the operation execution time involving two work centers.
You can view the result in the Gantt chart.
Let’s review. In this topic we have studied the following:
- Operation is divided into jobs.
- How the time consumed by an operation in a work center is set up. What the Times tab, Formula field, Qty. of work centers field are used for.
- How consumed time is calculated for independent and simultaneous operations.
Several notes:
- Simultaneous jobs can be created on the basis of simultaneous operations or when an operation uses more than one work center.
- Setup job always links Hard to Process job.
Cost of Operation
We have already discussed that an operation is divided into jobs. The cost of an operation is a sum of all jobs’ cost. Job cost is defined with the help of cost categories.
Open the Route form under Production > Common Forms > Route details > Find the Wooden chair route > Click the Route button.
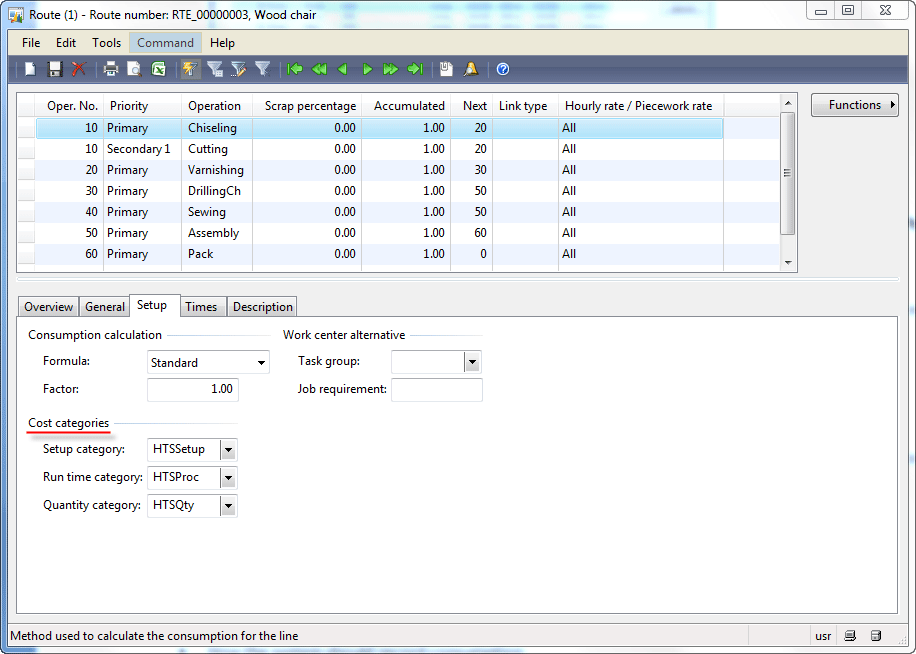
On the Setup tab, cost categories are specified:
The cost category contains the rate per hour. We can see that only the Setup and the Process job costs can be specified (with the help of the Setup category and Run time category fields). This means that other job types such as Queue before, Queue after, Transit are used only for calculating the time consumed by operations not the cost (these job types can only be reported as started and ended).
In our case, all operations except Cutting have the same values in the Setup category and Run time category fields because they are handled in the same work center group (these parameters are filled in by default from the work center group).
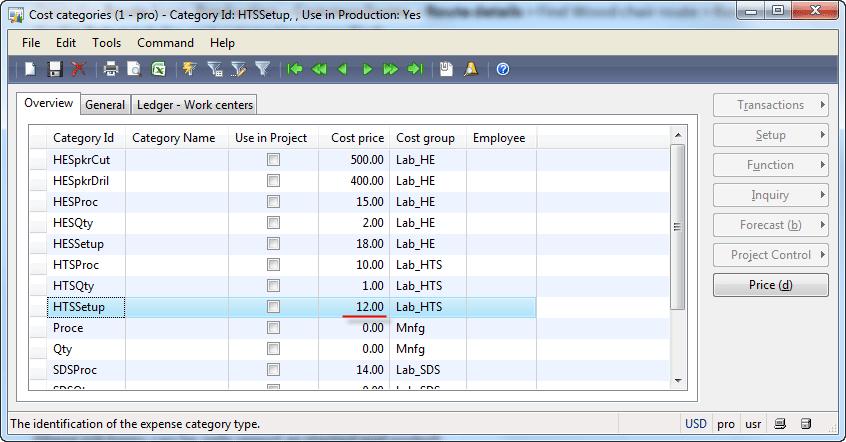
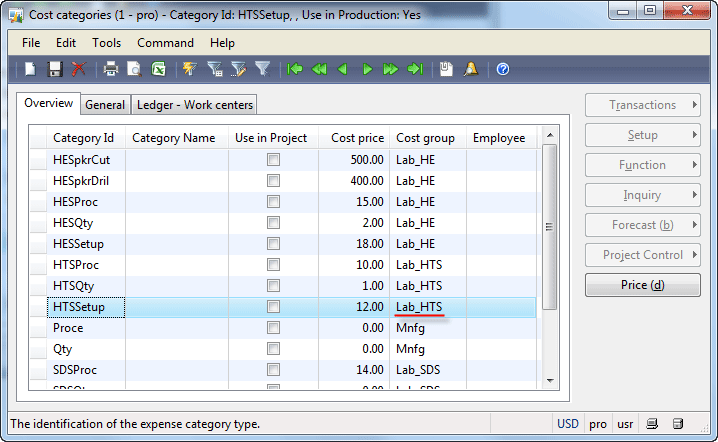
Let’s check what the cost of the setup time is. In the Setup category field, right-click and select Go to the Main Table Form. The Cost categories form opens.
We can see that the cost of Setup time is 12 per hour. On the Ledger-Work centers tab, the general ledger accounts that will be used for recording costs for this category are available.
The Process time uses the HTSProc cost category and the cost of the Process time is 10. One more cost category is available in the Route form is Quantity category. This cost category specifies the quantity-dependent cost. The Setup and Run time categories contain the time-dependent costs.
Let’ check the cost of a BOM:
- Open a scheduled production order (Production > Common Forms > Production order details).
- In the Production orders form, click the Inquiries > Price calculation menu button. The Calculation form opens.
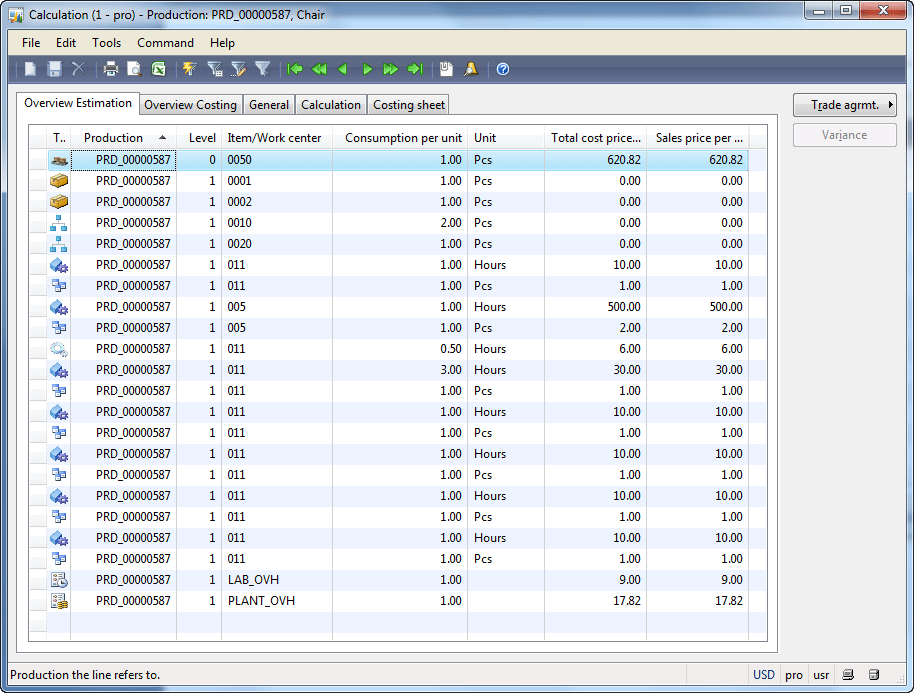
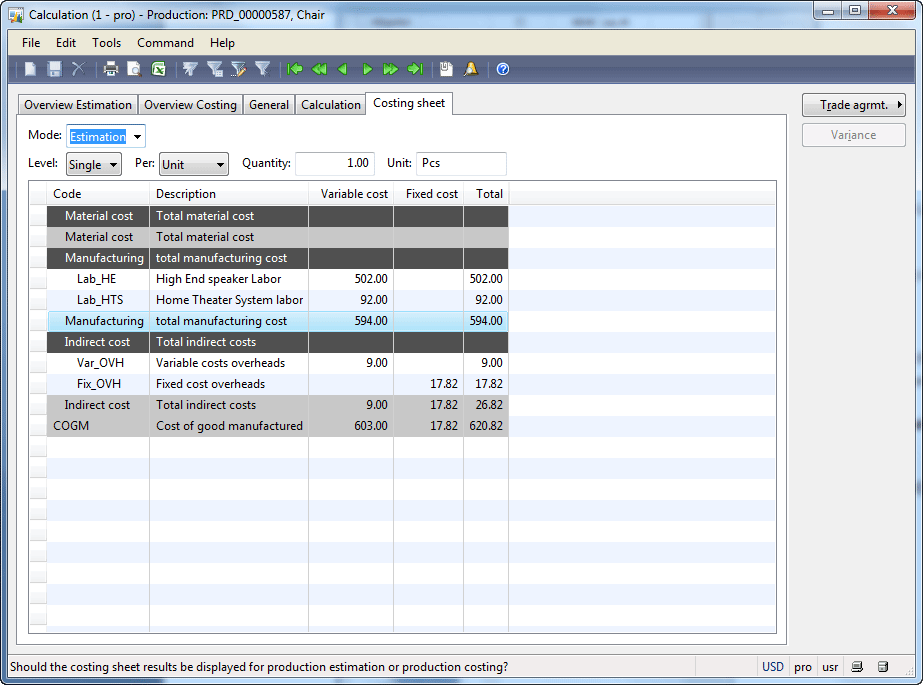
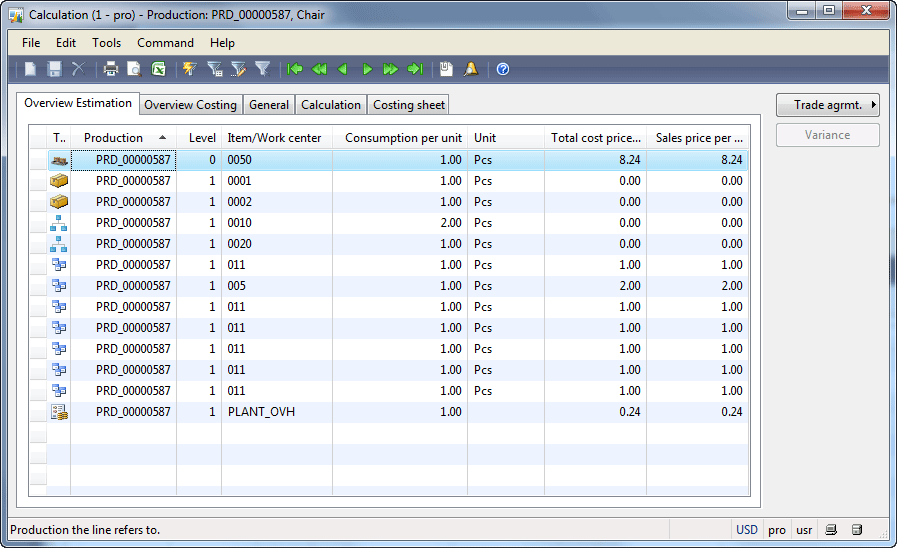
We can see that the total cost price of a produced chair is 620.82. The cost price of BOM components is zero (the lines from 2 to 5). The first Chiseling operation contains only 1 hour of run time and 1 product to produce, so the cost of this operation is 1 * 10 (from the run time cost category) + 1 * 1 (the form quantity cost category) = 11 (lines 6-7). The rest of costs are calculated in the same way except the last two lines.
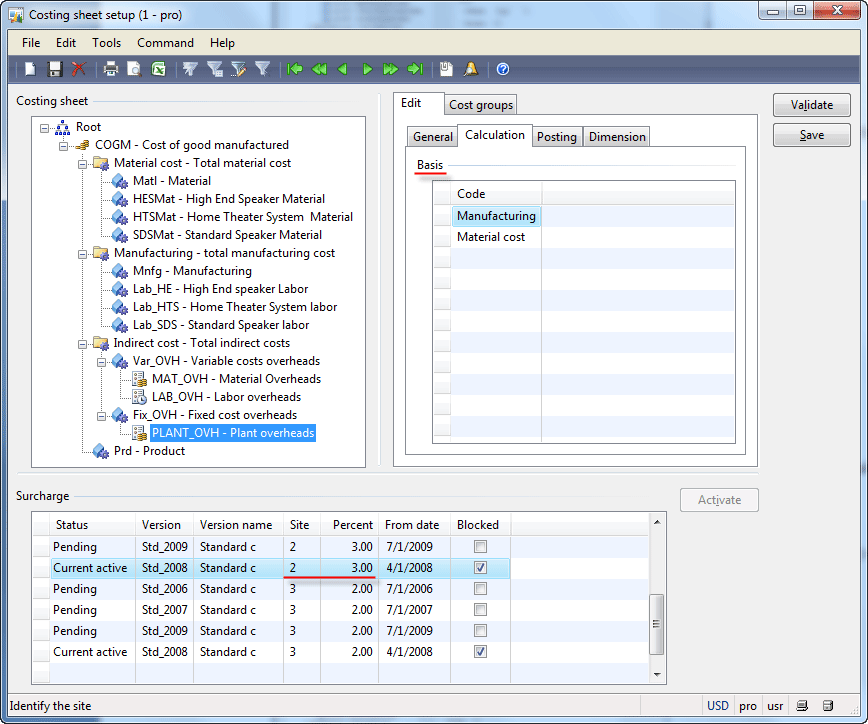
The last two lines are indirect costs. This type of cost depends on BOM or route costs. The rate for indirect costs is set up in the Costing sheet. Let’s check what rates are set up for the LAB_OVH and PLANT_OVH indirect costs:
- Go to Inventory management > Setup > Bills of materials > Costing sheet setup. The Costing sheet setup form opens.
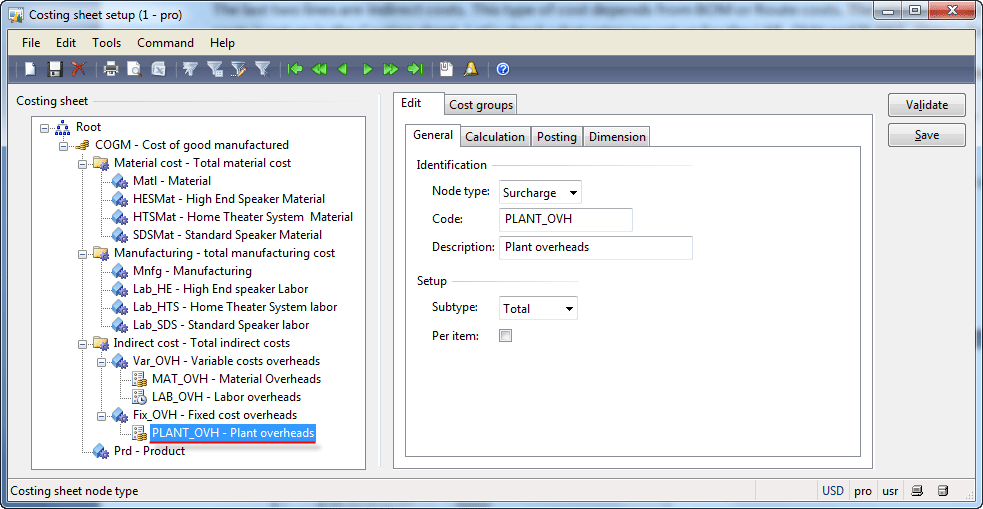
- In the Costing sheet tree, find and select the tree node Root > COGM (Cost of goods manufactured) > Indirect cost > Fix_OVH (Fixed cost overheads) > PLANT_OVH (Plant overheads).
- To find the rate for this indirect cost, go to the Calculation tab. In the Surcharge field group, find the rate for the site 2 with Current active status:
We can see that the basis for calculating indirect costs is the manufacturing and material costs. The percent of plant overheads cost is 3. The cost rate of operation is set up in the cost categories (the Setup or Run time cost categories), cost categories are united in cost groups, then in the Costing sheet the cost groups are assigned either to material or manufacturing costs. Let’s calculate the PLANT_OVH cost. In our example, the operation setup cost category is HTSSetup, it belongs to the LAB_HTS cost group, and this cost group belongs to the manufacturing cost (see the previous cost sheet image).
The operation run time cost category is HTSProc, this category also belongs to the LAB_HTS cost group, so this cost is also for manufacturing. The quantity cost category also belongs to the Manufacturing cost. Since the operation cost category is transferred to job cost category, the manufacturing cost will be calculated in the following way: Manufacturing cost = jobs’ setup cost + jobs’ process cost + jobs’ quantity cost. PLANT_OVH = 0.03 * Manufacturing cost. We can see the jobs costs in the Calculation form (all lines except the first 5 lines). If we sum all costs, we will receive the 594 amount, if we multiply this amount by 0.03, we will receive the 17.82 amount (exactly the same amount as in the PLANT_OVH line, Total cost price field in the Calculation form). In Microsoft Dynamics AX, it is possible to see all costs summed up in a costing sheet. In the Calculation form, go to the Costing sheet tab.
- The base amount of LAB_OVH is Manufacturing costs and the rate is 1. Note that it is not in percent. Try to understand why the LAV_OVH cost equals 9. As for me, this is not very easy 😉
How Operations are Treated in Microsoft Dynamics AX
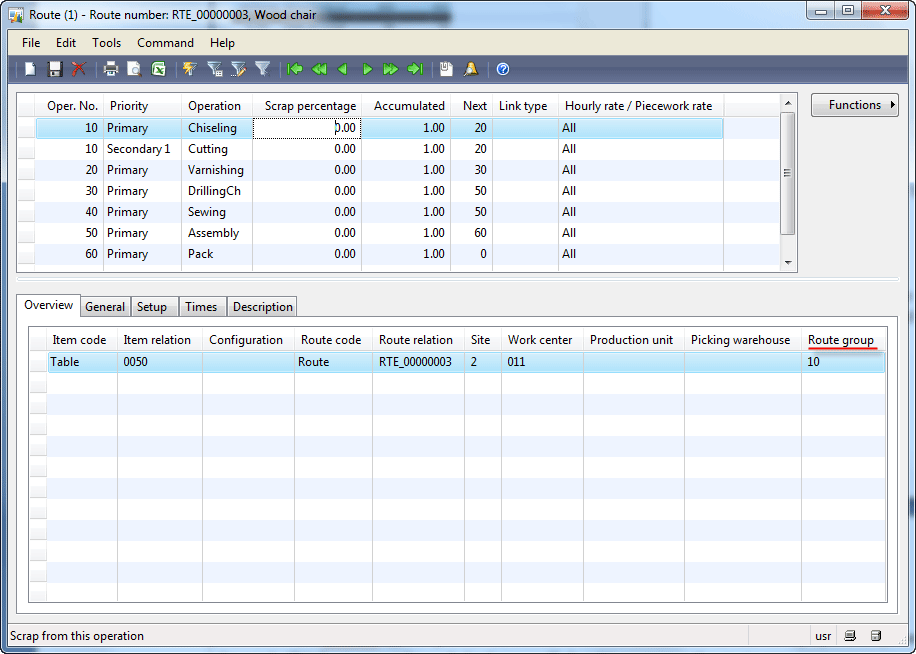
We already know that an operation can be divided into jobs. A job can be included or excluded from calculation of operation consumed time and cost. This is controlled with the help of a route group. Route groups are set up on operations. Open the Route form under Production > Common Forms > Route details > Find the wooden chair route > Route button.
In our case, all operations use the same route group:
Let’s analyze what parameters are available for the route group: Open the Route group form under Production > Setup > Routes > Route groups.
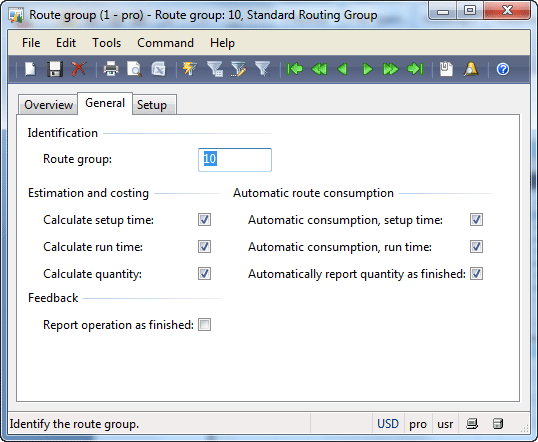
On the General tab, the following parameters are available:
- Estimation and costing field group is used to control whether the setup job cost, run time job cost, or quantity cost are included in the production cost. For example, if the Calculation setup time and Calculation run time fields are empty, the Calculation form will have the following view (after the Estimation process):
Compare this image with the previous Calculation form image to make sure that the Setup and Run time costs are not included.
- We will understand the meaning of the Automatic route consumption field group in more detail in the next lesson. Shortly, these fields are used to automatically finish a job without a job registration process. This can be used when the cost of the job is calculated correctly and doesn’t require the manual input.
- Feedback field group is used during the production finish process. If the Report operation as finished check box is cleared, an operation must be finished before the production is finished.
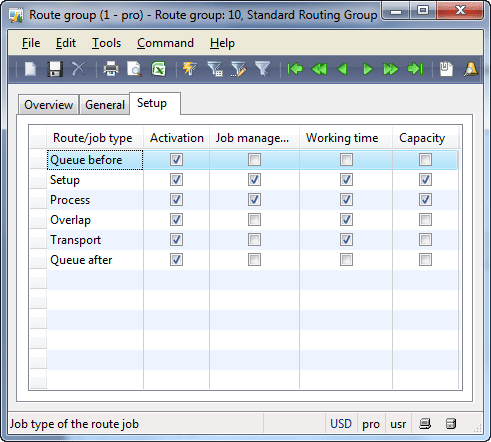
On the Setup tab, the following parameters are available:
- The Activation check box is used to control which job types will be created for the operation. Note that if a job is not created, the time consumed by this job will not be included in the production time. For example, if the Queue before and Setup jobs have the Activation check box cleared, then after the job scheduling process, the Jobs form will have the following view:
Compare this image with the previous Jobs form image to make sure that the end time differs and the Queue before and Setup jobs are not created.
- The Job management check box is selected if the job must be registered and finished. If a job must be finished, a production order can’t be reported as finished until the job is finished.
- The Working time check box specifies if work center working time is taken into account when job start and end time is estimated. For example, if this check box is cleared for the Process job the Gantt chart form will have the following view:
Compare this image with the previous Gantt chart form image. We can see that only the process for the operation 40 starts from the very beginning of the day (not taking the work center calendar into account). All other processes are connected to each other, but why does the process for the operation 10 start at 10:00 A.M.? It is because the Production module is connected with the Master planning module. The default start time for the first production job is taken from Master planning > Setup > Parameters > Planned orders tab > Planned order field group > Receipt time field.
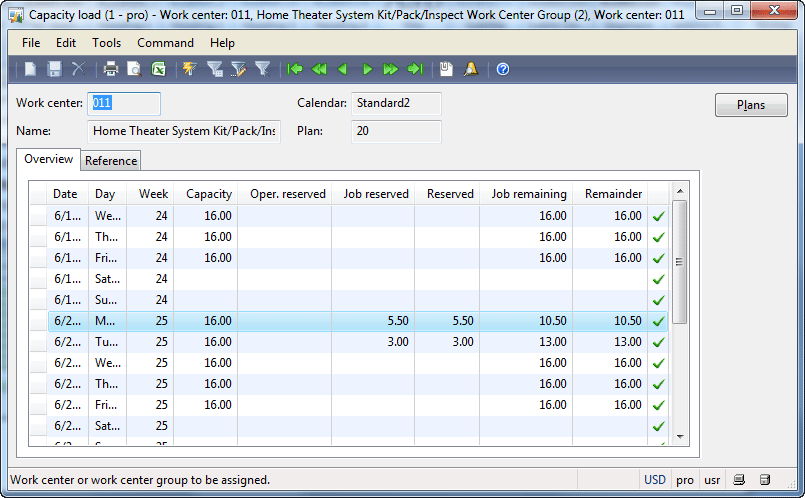
- The Capacity field is used to set up whether a work center is unavailable during processing a job. In our example, when the Process job is being executed, the work center can’t execute another job. But, when a chair item is drying (the Queue after job), the work center can execute another job, if it is available. Let’s check the reserved work center capacity under Basic > Common Forms > Work center groups > Find 011 work center group > Inquiries > Capacity load button.
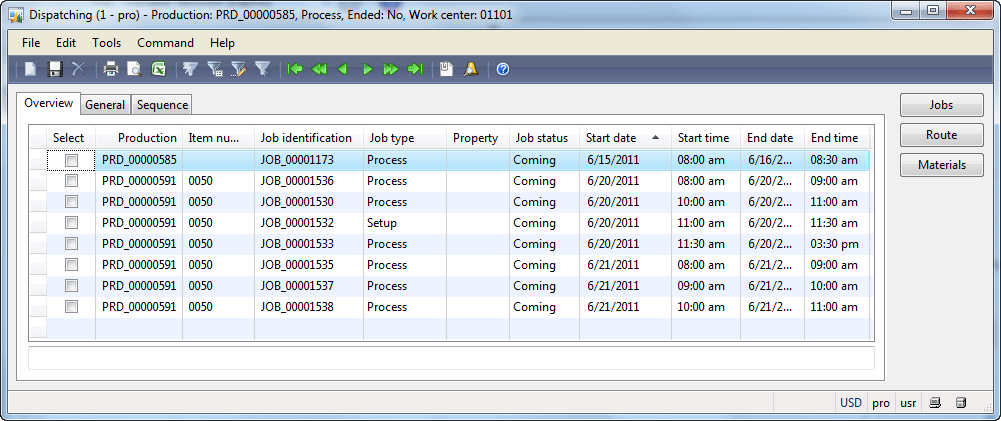
We can see that 5.50 hours are registered for Monday (but the sum of jobs on Monday for the work center group 011 is 7.50 hours) and 3.00 hours are registered for Tuesday. Let’s find out what jobs reserve the time in the work center 01101. In the Work center groups form, click the Work centers button. The Work centers form opens. Select the work center 01101 and the click the Dispatching button. The Dispatching form opens.
We can see that the Queue after job does not reserve any time in the work center.
Summary
Good work! 😉 In this training lesson, we have studied the following:
- Route: what it is and how it is created
- Operation: what it is and how it is created
- Route networks: simple operations, independent operations, and simultaneous operations
- Route operations: what they are and how they can be created
- Jobs: what they are and how they can be generated
- Time consumed by an operation: how the start and end time is calculated for a production order, what the consumption calculation formula, operation link type, simultaneous operations, Qty. of work center, calendars, and Gantt chart are.
- Cost of operations : how a price for the production order is calculated, what indirect costs, costing sheet, cost category, cost group are
- How an operation is treated in Microsoft Dynamics AX: what a route group and capacity load are
In the next training lesson, we will learn how the Production process is realized in Microsoft Dynamics AX.




Dear bloger,
Many fans of your blog are waiting to see you next post on production training. Kindly keep your excellent efforts continue.
Awaiting for your next posts
Regards
Syed
i am a new fan of ur blog sir please continue ur postings.we are waiting dor ur new posts in production and technical sir
regards
teja from india
Simply Awesome Explanation of all basic concepts.
I am super excited to see upcoming posts.
Regards
Rahul
How can I disable or remove a work center from work center group? We initially setup work centers to represent an employee instead of a type of worker. Now, those work centers have transactions and can’t be deleted, so I need a way to disable them in the work center group so they are not longer used.
HI
Is this route site=-specific? is there a way to map different sites for a single route?
ex:
Route No: 100
Opr 10: site 1
opr 20: site 1
opr 30: site 2
opr 40: site 3 etc..
is tat scenario possible? if not then any solution??
Outstanding!!!!
this stuff is really gr8, its not only fill the small gaps but also clear them with simple examples….
i must appreciate this..
keep doing the same work…
Hello,I have a little problem. Job scheduling menu button is disabled. Please help me.
Thank you
Thanks a lot for the valuable effort.
regards.
Edip