Agenda
- Introduction
- Creating Components
- Creating BOM Item
- Creating Sub-BOM Items
- Creating BOM
- Checking how it works
- Creating BOMs for the Chair Arm and Substructure BOM Items
- Configuring the Chair Arm and Substructure BOM Items
- Summary
Introduction
Hi there! Today we will work with Bill of materials (BOM) and cover the following topics:
- Create a BOM items and a component items
- Create a Bill of materials (BOM)
- Configure a Bills of materials. Working with a BOM configuration and an item configuration.
- Setup relations between a BOM item and a BOM
- Sales order and BOM.
Let’s assume that our Company has decided to start producing a chair. As Product Designers, we will create a new BOM in the Microsoft Dynamics AX.
A Product Designer analyzes what components are required for build a chair.
The chair has the following components:
- Back
- Seat
- Chair base
- Castors
- Arm pads
- Arm brackets
- Task chair control
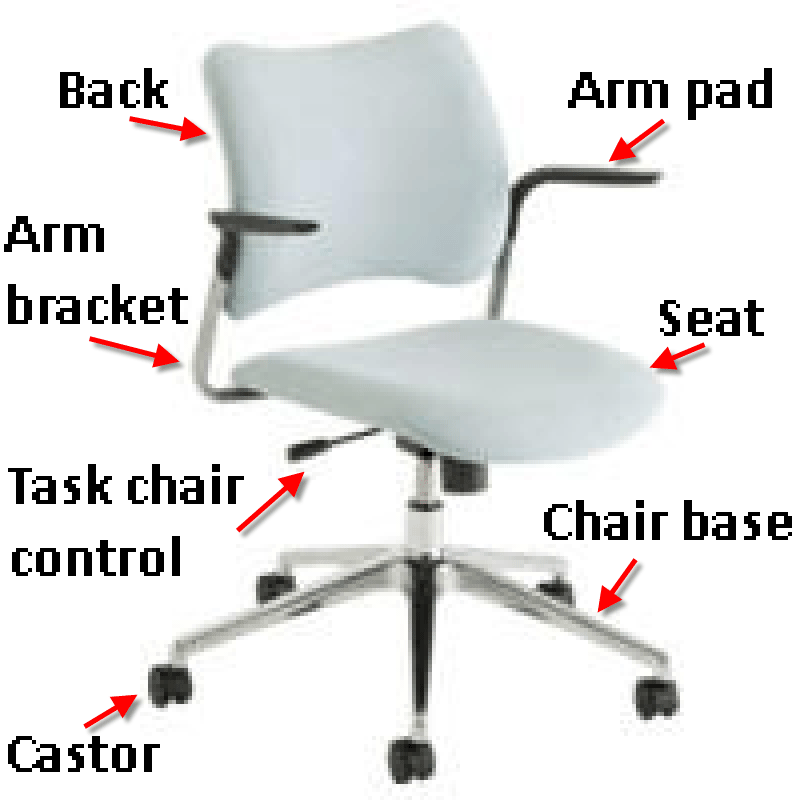
Chair
First, the Product Designer must create the components required for the BOM.
Creating Components
Let’s create the back, seat, chair base, castors, arm pads, arm brackets, and task chair control items. I will use the same demo data. Just to recall, our demo data is accessible here.
We have already created the Bottle and Can items in this training lesson. So, now it must be easier to create new items. To create an item perform the following steps:
- Go to Inventory Management > Common Forms > Item details. The Item form opens.
- Create a new line (Click CTRL + N).
- Select the Blank record template (if you have more than one record template).
- Fill in the fields with the following values:
- The Item number field with the 0001 value.
- The Item name field with the Back value.
- The Item group field with the Packaging value. If you don’t understand what the item group is used for, read this lesson.
- Go to the General tab.
- The Inventory model group field with the FIFO value. If you don’t understand what the inventory model group is used for, read this lesson.
- The Dimension group field with the CF-W (Color, Configuration, and Warehouse dimensions) value. If you don’t understand what the dimension group is used for, read this lesson.
- Save the line (CTRL +S).
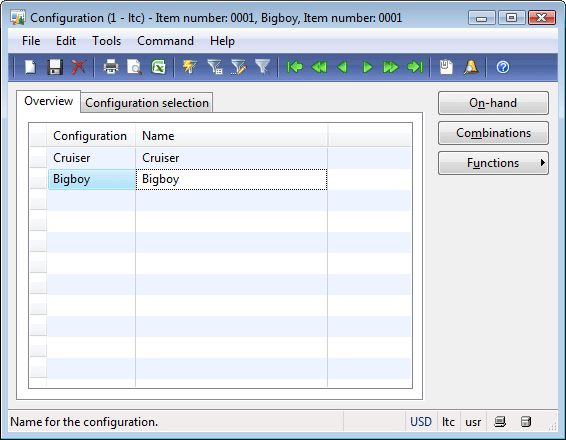
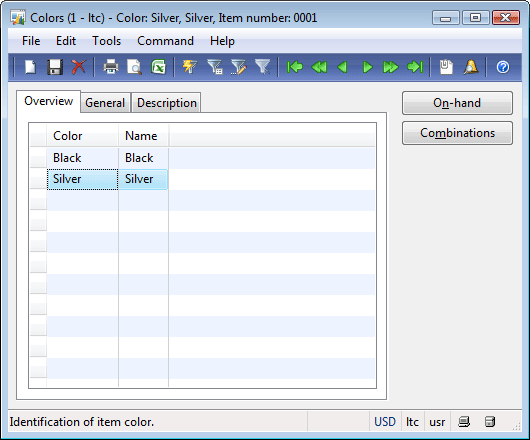
- Set up dimensions for the Back item. We assume that the Back item has two configurations: Cruiser and Bigboy, and two colors: Black and Silver.
- Click Setup >Configurations button. The Configuration form opens.
- Create the Cruiser configuration dimension. Click CTRL + N.
- Fill in Cruiser in the Configuration and Name fields. Save the line.
- Create and save the Bigboy configuration.
- Close the Configuration form.
- Click Setup >Colors. The Colors form opens.
- Create the Black color dimension. Click CTLR + N.
- Fill in Black in the Color and Name fields. Save the line.
- Create the Silver color dimension.
- Create dimension combinations. Read more about dimension combinations here.
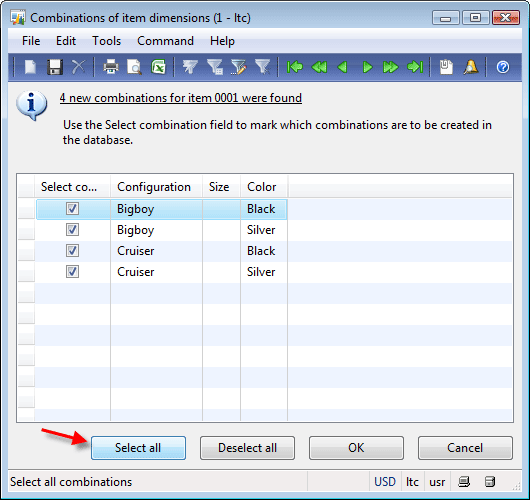
- In the Colors form, click the Combinations button. The Combinations of item dimensions form opens.
- Click the Create combinations button. The Combinations of item dimensions form opens.
- Click the Select all button. All dimension combinations are selected.
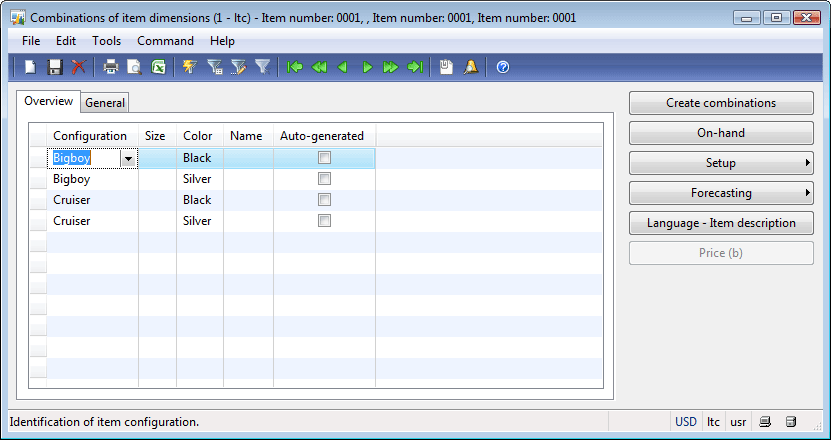
- Click OK. The Combinations of item dimension form shows only two combinations. That is because this form shows the combinations for the Silver color.
- Close the Combinations of item dimensions form.
- Close the Colors form.
- Make sure that all dimensions combinations are created.
- In the Item form, click Setup > Item dimension combinations button. Make sure that all combinations are created.
We have created the Back item with the following configurations: Bigboy, Cruiser and with colors: Black and Silver.
Repeat the same steps and create items with the following dimensions:
- Seat item. Item number 0002. Seat configuration: round seat and grubby seat. Seat colors: Black and Silver.
- Chair base item. Item number 0003. Chair base dimension group is F-W (configuration and warehouse). Chair bases configuration: highrise alloy and alloy base.
- Castor item. Castor dimension group is F-W (configuration and warehouse). Item number 0004. Castor configuration: standard and chrome hooded.
- Arm pad item. Item number 0005. Arm pad configuration: AP1 (Flat polyurethane arm pad) and AP2 (“Z” polyurethane arm pad). Arm pad colors: Black and Silver.
- Arm bracket item. Item number 0006. Arm bracket configuration: AAB1 (Adjustable arm bracket) and AAB3 (Adjustable trigger arm bracket). Arm bracket colors: Black and Silver.
- Task chair control item. Item number 0005. Task chair control dimension group is F-W (configuration and warehouse). Task chair control configuration: STENO04 (steno lever lock) and STENO22 (steno reflex control).
I have prepared the data and definition files with the above-mentioned items. If you don’t want to repeat the same steps, just download these files and import them to Microsoft Dynamics AX. If you don’t know how to import demo data, read this lesson. During import, you will be asked to overwrite several tables, in this case select all tables and click OK. After the end of process, go to the Item form and make sure that all items are there. Do this in the test environment (test company), because your custom items will be overwritten.
Creating BOM Item
Now, the Product Designer creates the Chair item. To create the Chair item, he or she performs the same steps as when creating an ordinary item: BOM item type.
- Open the Item form (Inventory Management > Common Forms > Item details).
- Create a new line.
- Fill the Item number field with the 0050 value.
- Fill the Item name field with the Chair value.
- Item group = Packaging
- Item type = BOM
- Go to the General tab.
- Inventory model group = FIFO
- Dimensions group = F-W
- Save the line.
We assume that the company has the following types of chairs: Black and Silver with Standard, Business, and President configurations.
You can ask why the Product Designer creates the Chair item only with the Configuration item dimension (Dimension group = F-W, i.e. Configuration and Warehouse) and without the Color dimension? This is because in Microsoft Dynamics AX, only Configuration dimension of a BOM item can affect the configuration of BOM components. In other words, the Product Designer can’t set up relations between the Chair colors and the Chair component colors.
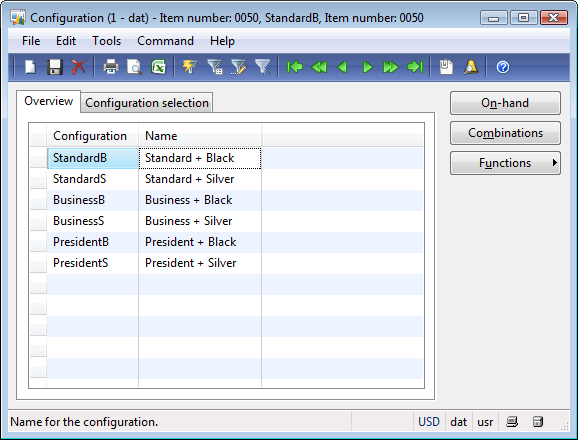
So, the Product Designer creates the following configuration dimensions: StandardB (Standard + Black), StandardS (Standard + Silver), BusinessB (Business + Black), BusinessS (Business + Silver), PresidentB (President + Black), and PresidentS (President + Silver).
Create these dimensions for the Chairs item in the same way as for the other items:
- In the Item form, click Setup > Configurations. The Configurations form opens.
- Create the StandardB (Standard + Black), StandardS (Standard + Silver), BusinessB (Business + Balck), BusinessS (Business + Silver), PresidentB (President + Black), and PresidentS (President + Silver) configurations.
- Close the Configurations form.
As we can see, there is no difference between the item with the Item item type and the item with BOM item type. The only difference is when the cursor is on the item of the BOM item type, the Route button and the BOM menu button are available in the Item form. As I know, in the new version of Microsoft Dynamics AX, the Item type field will be removed from the Item form.
We create the BOM item but this item doesn’t have the receipt of components. The BOM will be created a bit later.
Creating Sub-BOM Items
The Product Designer decides to create additional BOM items: Chair arm and Substructure. This is because the Chair arms items are produced and stored independently and the Substructure items must be referenced as one item (what for, we will know a bit later).
The Chair arm item will contain the Arm pad and the Arm bracket components.
Substructure will contain the Chair base, Castors, and Task Chair control components.
These BOM items will be used as components of the Chair item and will be called sub-BOMs.
Note: Create a sub-BOM item for BOM components if these components are managed together. Generally, several BOM components need its own level in the BOM if, at a particular stage, the components must be:
- Tracked
- Stored
- Sold
We already know that BOM item should contain only configuration dimension active.
Let’s assume that the Substructure item must have the following configuration dimension: Base, Business, and Lux.
And the Chair arm item must have the following configuration dimension: StandardB (Standard + Black), StandardS (Standard + Silver), ExtendedB (Extended + B), and ExtendedS (Extended + Silver).
In the next chapter, will specify the combination of components + dimensions that must be used for each chair item configuration dimension.
Let’s create sub-BOM items. Sub-BOM item is the ordinary item with the BOM item type:
- Open the Item form (Inventory management > Common Forms > Item details).
- Create a new line.
- Fill the Item number field with the 0010 value.
- Fill the Item name field with the Chair arm value.
- Item group = Packaging
- Item type = BOM
- Go to the General tab.
- Inventory model group = FIFO
- Dimensions group = F-W
- Save the line.
- Create configurations.
- In the Item form, click Setup > Configurations. The Configurations form opens.
- Create the StandardB (Standard + Black), StandardS (Standard + Silver), ExtendedB (Extended + Black), and ExtendedS (Extended + Silver) configurations.
- Close the Configurations form.
- Repeat the same steps for the Substructure item. Item number is 00020, Configuration dimension: Base, Business, and Lux.
I have created data file with the BOM and Sub-BOM items. You can download it here.
Creating BOM
We create the BOM items but these items don’t have the receipt of components. Let’s create the BOM.
As we learned from the previous training lesson, BOM is used to set up materials required for a product. BOM is a list of raw materials, sub-assemblies, intermediate assemblies, sub-components, components, parts and the quantities of each needed to manufacture an end product.
Let’s create a new BOM for the Chair item:
- Go to the Inventory Management > Common Forms > Bills of materials. The BOM form opens.
- Create a new line (click CTRL + N).
- The BOM field will be filled in automatically. It is because the number sequence for BOM is set up. (Inventory Management > Setup > Parameters > Number sequences tab > “BOM” line.)
- Fill in the BOM for Chair value in the Name field.
- Select site 2 in the Site field.
- Save the line (click CTRL + S).
The Product Designer decides to create one BOM for all possible Chair configurations and colors instead of creating separate BOMs for each combination of Chair configuration and color. The Microsoft Dynamics AX allows creating one BOM for all possible configurations with the help of BOM configurations and Item configurations.
The advantage of configurations is that only one BOM item and one BOM is required.
The Product Designer sets up the following lists of components for the Chair item:
- The Standard Chair item must contain the following elements:
- Back – Cruiser
- Seat – Round seat
- Substructure – Base
- Chair arms – without chair arms
- The Business Chair item must contain the following elements:
- Back – Cruiser
- Seat – Round seat
- Substructure – Business
- Chair arms – Standard
- The President Chair item must contain the following elements:
- Back – Bigboy
- Seat – Grubby seat
- Substructure – Lux
- Chair arms – Extended
All these three BOMs must be combined into one. Also, all BOMs must exist in two colors: Black and Silver.
To combine all BOMs in one, the Product Designer decides to create the following BOM configurations: BlackCh, SilverCh, Substruct, and Arms. BOM configurations depend on the BOM item configuration, each BOM configurations can be enabled or disabled.
Let’s create BOM lines for the Chair item.
- Go to the Inventory Management > Common Forms > Bills of materials. The BOM form opens.
- Find the BOM for Chair BOM. Click the Lines button. The BOM line form opens.
- Crete a new line (CTRL + N) for the Black Back component.
- Fill in 0001 in the Item number field.
- Select Black in the Color field.
- Select 22 in the Warehouse field.
- Set 1 in the Quantity field.
- Type BlackCh in the Configuration group field. Press the Tab keyboard button.
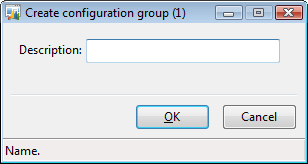
- The Create configuration group form opens.
- Fill in the BOM configuration description: Black chair. Click OK. The new BlackCh BOM configuration is created. You can find one in the Configuration groups form (Inventory Management > Setup > Bills of materials > Configuration groups).
- In the BOM line form, go to the General tab and make sure that the Line type field contains the Item value (the BOM field group).
- Save the line (CTRL + S).
- Crete a new line (CTRL + N) for the Silver Back component.
- Fill in 0001 in the Item number field.
- Select Silver in the Color field.
- Select 22 in the Warehouse field.
- Set 1 in the Quantity field.
- Type SilverCh in the Configuration group field. Press the Tab keyboard button.
- The Create configuration group form opens.
- Fill in the BOM configuration description: Silver chair. Click OK. The new BlackCh BOM configuration is created.
- In the BOM line form, go to the General tab and make sure that the Line type field contains the Item value (the BOM field group).
- Save the line (CTRL + S).
- Repeat the same steps for the Seat component.
- Crete a BOM line for the Chair arm component. Repeat the same steps but fill in Arms in the Configuration group field and 2 in the Quantity field.
- Crete a BOM line for the Substructure component. Repeat the same steps but fill in Substruct in the Configuration group field.
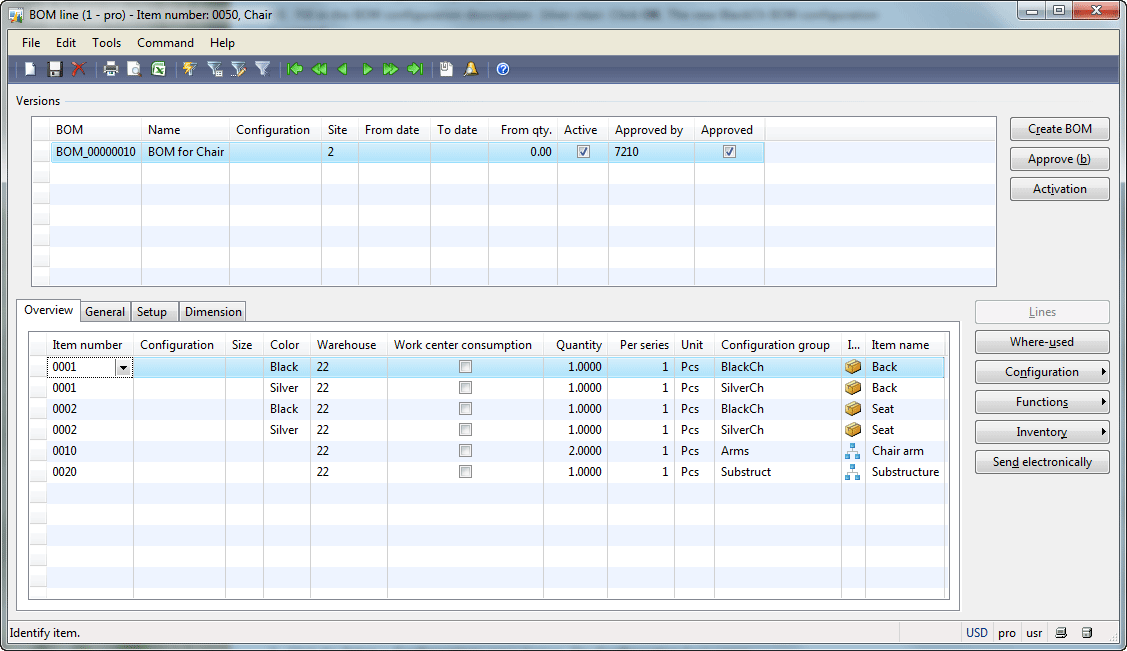
The BOM line form will have the following view:
Now the Product Manager must set up how the BOM configuration group depends on the BOM item configuration:
- Go to the Inventory Management > Common Forms > Item details. The Item form opens.
- Set the cursor to the 0050 Chair item.
- Click the Setup > Configurations menu button. The Configuration form opens.
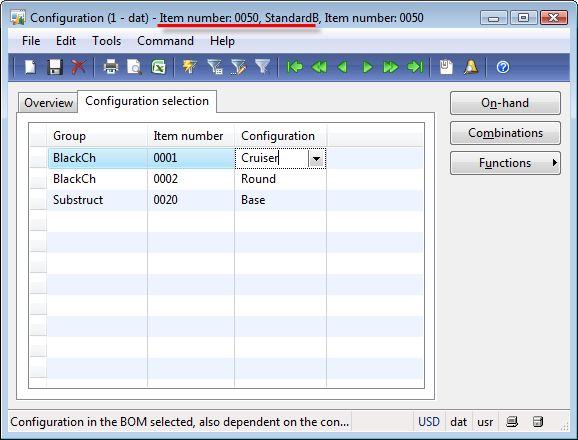
- Select the StandardB (Standard + Black) configuration and go to the Configuration selection tab. This tab is used for setting up the actual configuration of the BOM Line (components) for the selected BOM item configuration.
- For the Chair Standard + Black configuration we should set up:
- Back – Cruiser Black
- Seat – Round seat Black
- Substructure – Base
- Chair arms – without chair arms
- Create a new line.
- In the Group field, select the BlackCh configuration group.
- In the Item number field, select the 0001 (Back) item.
- In the Configuration field, select the Cruiser item configuration.
- Save the line.
- The Product Manager doesn’t create a line for the SilverCh configuration group. So, all BOM lines that belong to the SilverCh group will be excluded from the Chair item with Black configuration.
- Now, when the Customer purchases the Standard Black chair, the chair will contain the Black Cruiser back. If it is not clear enough, don’t worry as below you can see an example. Let’s continue setting up BOM lines for the StandardB (Standard + Black) configuration.
- Create a new line.
- In the Group field, select the BlackCh configuration group.
- In the Item number field, select the 0002 (Seat) item.
- In the Configuration field, select the Round item configuration.
- Save the line.
- Create a new line.
- In the Group field, select the Substruct configuration group.
- In the Item number field, select the 0020 (Substructure) item.
- In the Configuration field, select the Base item configuration.
- Save the line.
The Configuration selection tab of the Configuration form will have the following view:
We can see that the 0050 item Standard Black Chair doesn’t have the Arms group on the Configuration selection tab. This is because the Standard Chair configuration doesn’t have the chair arms.
The BOM item configuration is a components combination, such as a chair arms and a back that can be specified for a BOM item during the ordering process.
Set up the remaining chair configuration according to the Product’s Designer list of components for the Chair item.
I recommend that you set up at least one configuration yourself. Then, you can download the file with chair configurations set up.
Checking how it works
Let’s check how the Sales Manager will use the BOM item configurations in a daily work. To do this, we assume that the 1101 customer orders the Standard Black Chair item:
- Go to the Accounts Receivable > Common Forms > Sales Order Details. The Sales order form opens.
- Create a new sales order for the 1101 customer.
- Create a new sales line.
- In the Item number field, select the Chair item.
- In the Configuration field, select the StandardB (Standard + Black) configuration.
- Select site 2 in the Site field.
- Save the line.
- To check what components the standard black chair consists of, do the following.
- In line area of the Sales order form, click the Functions > Explode BOM menu button.
- The Explode BOM form opens.
We can see that the Chair item doesn’t have any components. This is because Microsoft Dynamics AX doesn’t know that the Chair BOM item uses the BOM for Chair BOM. Let’s set up a reference between the BOM item and the BOM. For this purpose, the BOM versions is used.
- Go to the Inventory Management > Common Forms > Bills of materials. The BOM form opens.
- Find the BOM item for Chair BOM.
- In the Versions area, create a new line (set the cursor to the empty grid and click CTRL + N).
- Select 0050 (Chair) in the Item number field.
- Save the line.
- Approve the version. Click the Approve button in the Versions area.
- The Approve version form opens. The employee id assigned to your Axapta User will be filled in automatically (is taken from Administration > Users > select current user > User relations button > General tab > Employee field). Click OK.
- Activate the version. Click the Activate button.
That is all, now the Microsoft Dynamics AX knows that the Chair BOM item uses the BOM for the Chair BOM.
Let’s check what the Explode BOM form will contain now:
- Go to the Accounts Receivable > Common Forms > Sales Order Details. The Sales order form opens.
- Find the created sales order.
- To check what components the standard black chair consists of, click the Functions > Explode BOM menu button in the line area.
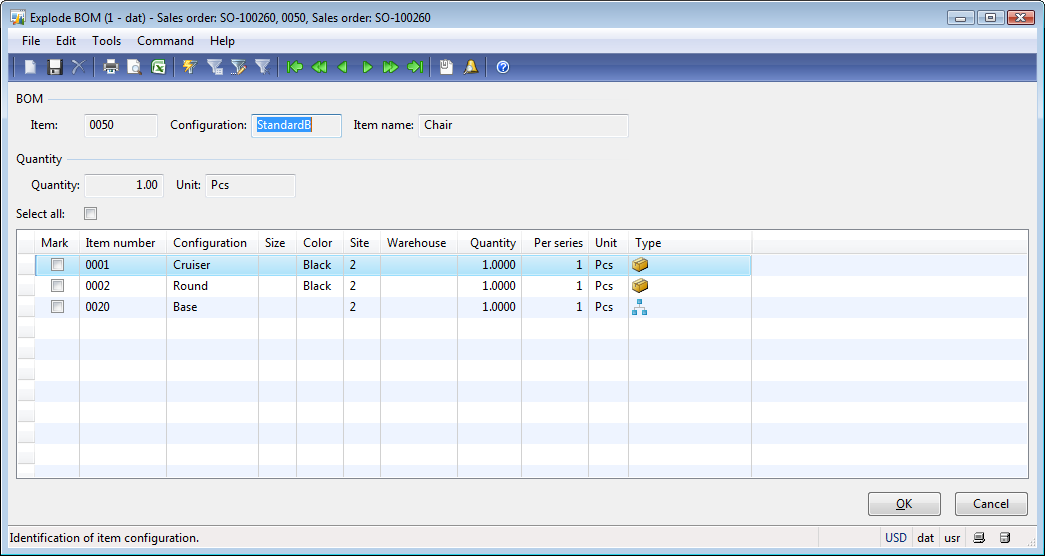
- The Explode BOM form opens.
We can see that the black standard chair consists of:
- Back (0001) – Cruiser Black
- Seat (0002) – Round seat Black
- Substructure (0020) – Base
- Without chair arms
This is what we expected.
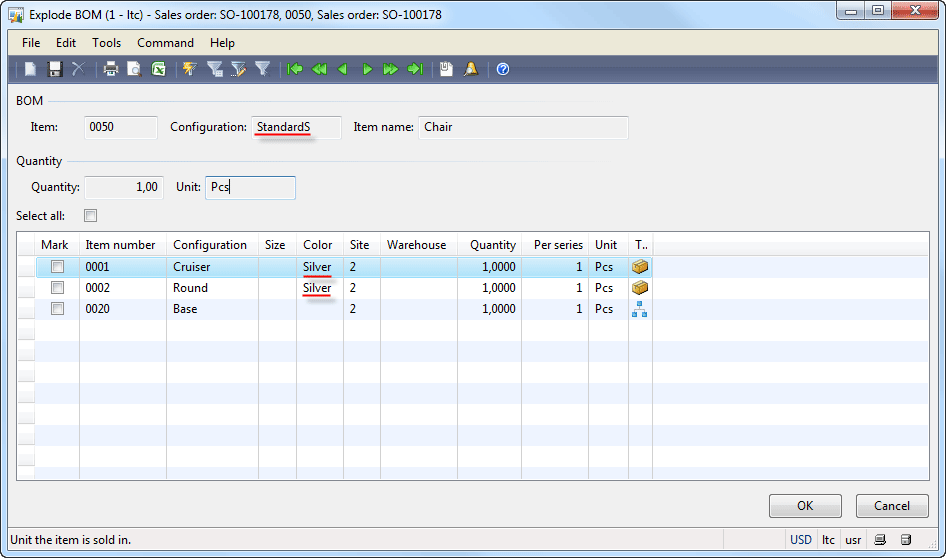
If you select the StandardS (Standard + Silver) chair configuration and have set up this configuration, the Explode BOM form will have the following view. If you haven’t set up this configuration, the Explode BOM form will be empty.
Sometimes it is required that the Sales Manager has the possibility to select component dimensions himself. For example, if the Customer orders the chair with Black Back and Silver seat. The Microsoft Dynamics AX can handle this case.
- Go to the Inventory Management > Common Forms > Item details. The Item form opens.
- Find the 0050 (Chair) item.
- Go to the General tab.
- Select the Configurable check box in the Product configuration group.
- Save the line.
Let’s check what has changed for the Sales Manager.
- Go to the Accounts Receivable > Common Forms > Sales Order Details.
- Find the created sales order.
- Select the new configuration for the sales order line
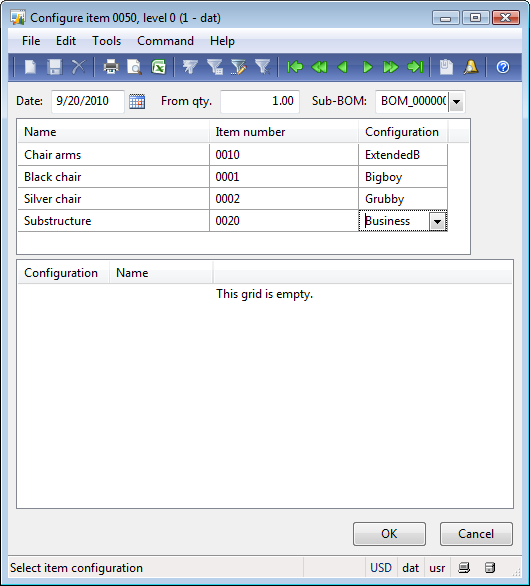
- The Configure item form opens. The Infolog with a warning shows. This is because the 0010 (Chair arm) and 0020 (Substructure) BOM items aren’t associated with BOMs.
- On the Chair arms record, select the ExtendedB (Extended + Black) configuration.
- On the Black chair record, select the 0001 (Back) item in the Item number field and Bigboy in the Configuration field.
- On the Silver chair record, select the 0002 (Seat) item in the Item number field and Grubby in the Configuration field.
- On the Substructure record, select the Business configuration.
- If the Chair configuration with the same settings exists, this configuration will be shown in the bottom grid. Otherwise, the grid is empty. Click OK.
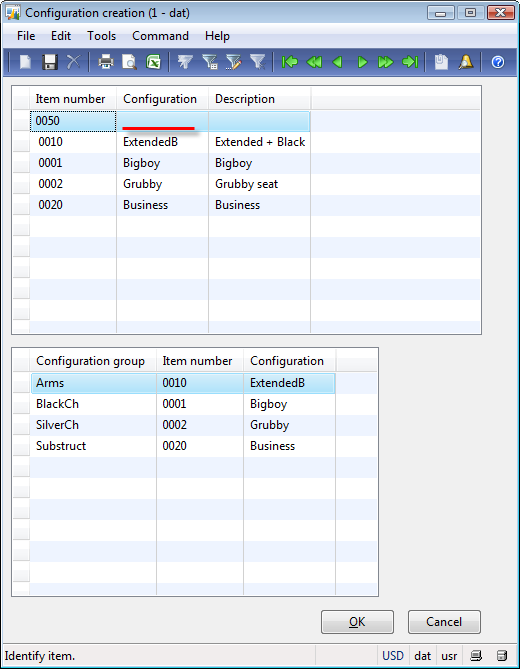
- Since the chair configuration with the required components configuration doesn’t exist, the Configuration creation form opens.
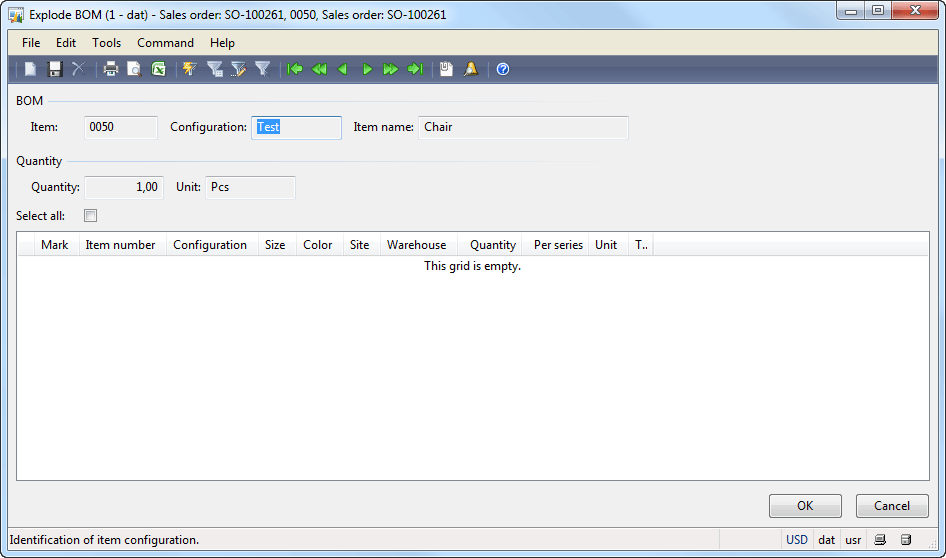
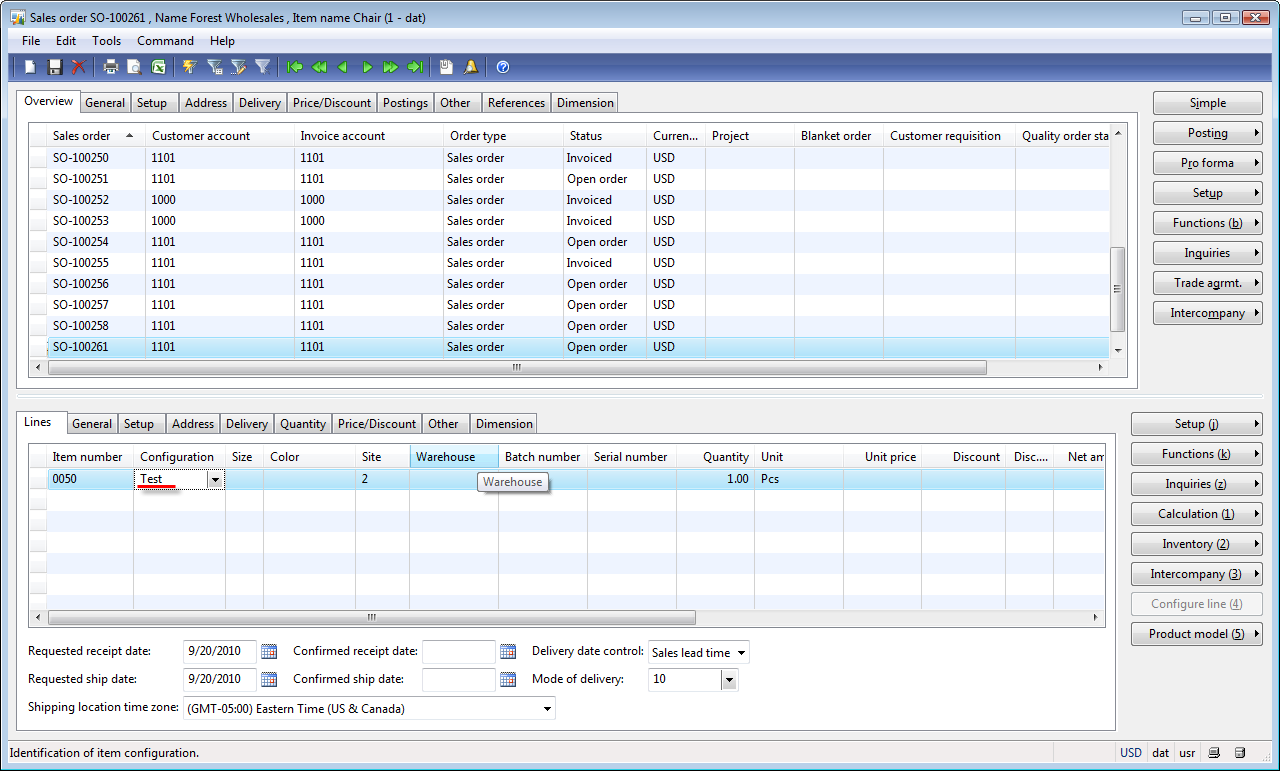
- Fill in the name for the new configuration in the Configuration field. For example, Test. Click OK.
- The new chair configuration is created and this configuration is used in the sales line.
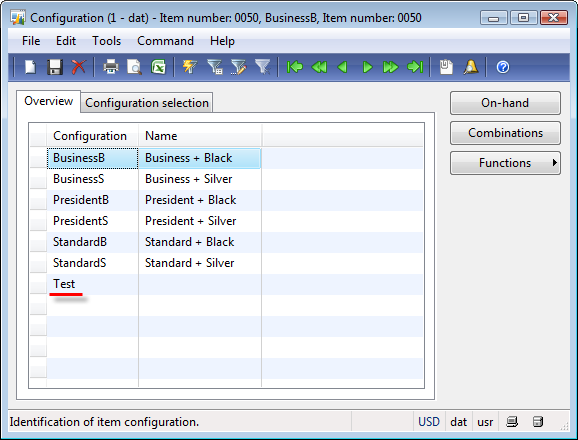
You can check that the new configuration is created. Go to the Inventory Management > Common Forms > Item details > find the Chair item > Setup > Configurations.
As you can see, in the Configure item form, we can’t configure more than one item from the configuration group. If you want to select the black bottom and black seat it can’t be done.
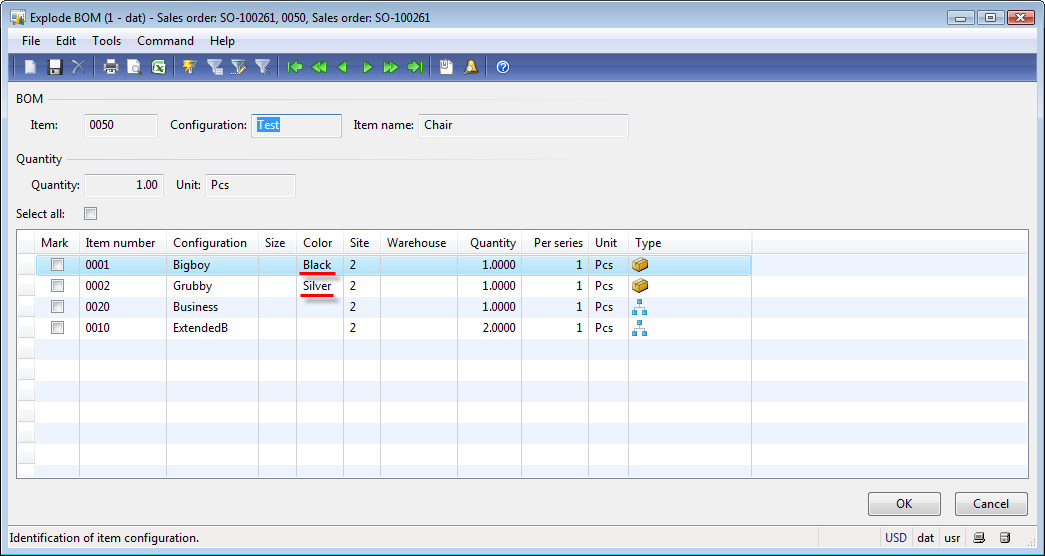
Let’s check what components there are in the Customer order:
- In the line area of the Sales order form, click the Functions > Explode BOM menu button.
- The Explode BOM form opens.
We can ensure that ordered Chair consist of black back and silver seat.
Creating BOMs for the Chair Arm and Substructure BOM Items
Now, we will create BOMs for the Chair arm and Substructure items. We will do this in the same manner as creating the BOM for the Chair BOM.
The chair arm contains the Arm pads and Arm brackets elements.
The substructure contains the Chair base, Castors, and Task Chair control.
Let’s create the Chair arm and Substructure BOMs:
- In the BOM form, create a new line (press CTRL + N).
- The BOM field will be filled in automatically.
- Fill in the BOM for Chair arm value in the Name field.
- Select site 2 in the Site field.
- Save the line (press CTRL + S).
- Repeat the same steps for the Substructure BOM.
In Microsoft Dynamics AX, we can configure the BOM in two ways:
- In the BOM line form (Inventory Management > Common Forms > Bills of materials > Lines button).
- With the help of the BOM designer (Inventory Management > Common Forms > Bills of materials > Designer button).
Let’s create the list of components with the help of the BOM line form for the BOM for Chair arm:
- In the BOM form, set the cursor on the BOM for Chair arm.
- Click the Lines button. The BOM Line form opens.
- Create the first line for the Arm pad component.
- In the Item number field, select the 0004 item (Arm pad).
- In the Color field, select the Black color
- Select 22 in the Warehouse field.
- Fill in 1 in the Quantity field.
- In the Configuration group field fill in the ArmPadB value. Press the Tab keyboard button.
- The Create configuration group form opens.
- Fill in the BOM configuration description: Arm pad black. Click OK. The new ArmPadB BOM configuration is created.
- Go to the General tab and make sure that the Line type field contains the Item value.
- Save the line.
- Create the second line for the silver arm pad.
- In the Item number field, select the 0004 item (Arm pad).
- In the Color field, select the Silver color
- Select 22 in the Warehouse field.
- In the Configuration group field fill in the ArmPadS value. Create new Arm pad silver BOM configuration group.
- Fill in 1 in the Quantity field.
- Go to the General tab and make sure that the Line type field contains the Item value.
- Save the line.
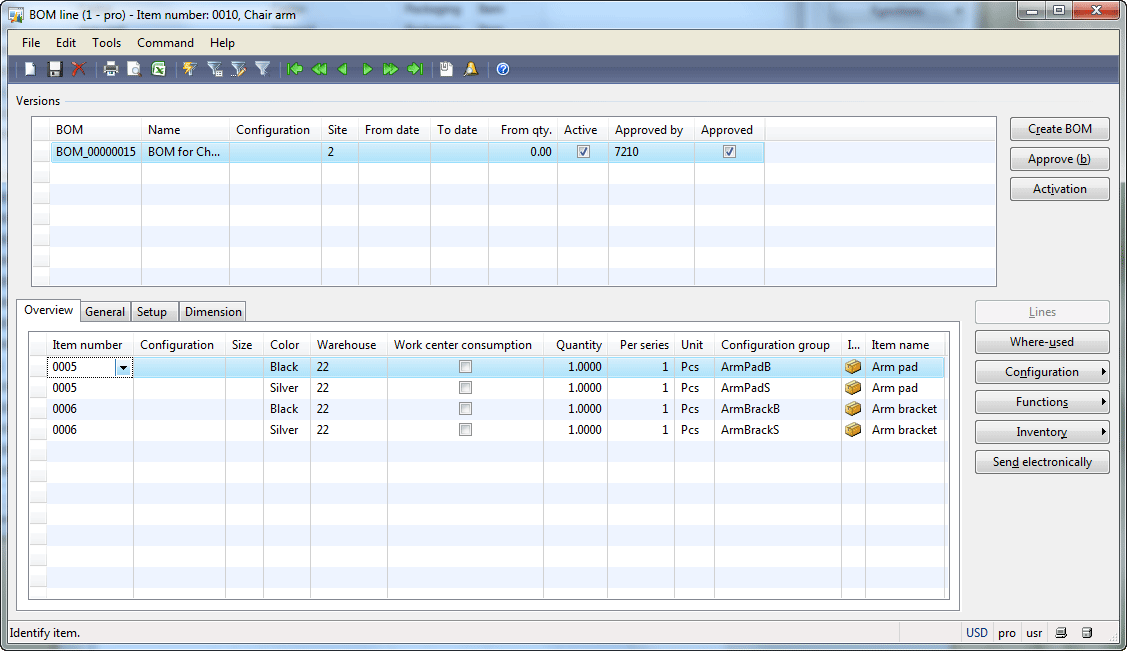
- Repeat the same steps for the Arm bracket component (BOM configuration groups are ArmBrackB and ArmBrackS)
The BOM line form will have the following view:
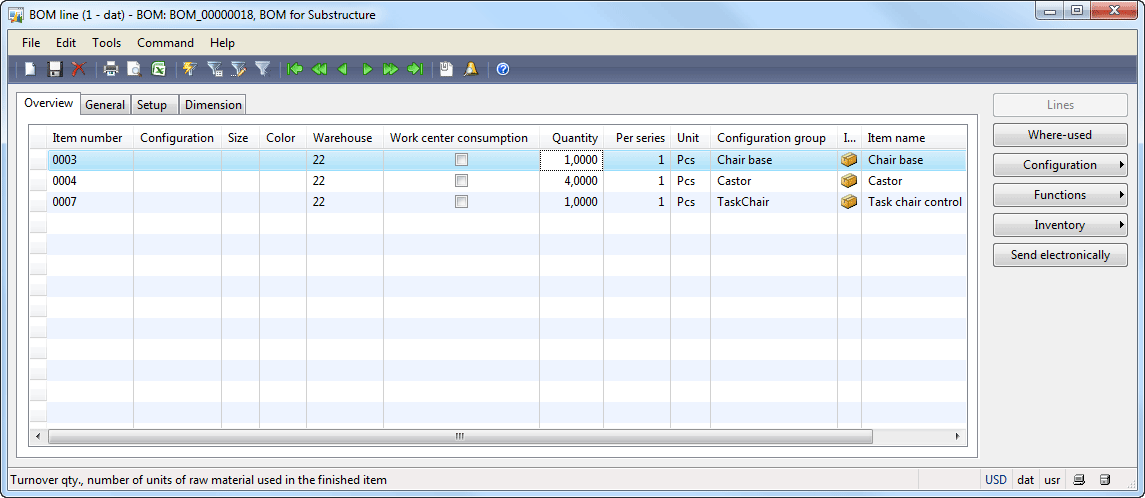
In the same way, create the list of components with the help of the BOM line form for the Substructure BOM. BOM configuration groups are Chair base, Castor, TaskChair. Note that the BOM for Substructure must contain 4 Castors.
The BOM line form will have the following view:
Now, we will assign the BOM items to the BOMs with the help of BOM versions.
For the Chair arm BOM item:
- Go to the Inventory Management > Common Forms > Bills of materials. The BOM form opens.
- Find the BOM for Chair arm record.
- In the Versions area, create a new line (set the cursor to the empty grid and press CTRL + N).
- Select 0010 (Chair arms) in the Item number field.
- Save the line.
- Approve the version. Click the Approve button in the Versions area.
- The Approve version form opens. Employee id assigned to your Axapta User will be filled in automatically (Employee id is taken from Administration > Users > select current user > User relations button > General tab > Employee field). Click OK.
- Activate the version. Click the Activate button.
Repeat the same steps for the Substructure BOM item.
That is all, now Microsoft Dynamics AX knows that the Chair arms item uses the BOM for Chair arms BOM and Substructure item uses the BOM for Substructure BOM.
You can download the demo file with the resulting data.
Configuring the Chair Arm and Substructure BOM Items
The last thing is setup relations between item configurations and BOM configurations for the Sub-BOM items. We already configure the Chair item.
We have created the following configurations for the Chair Arm and Substructure items:
- Chair arms: standard and extended in black and silver colors
- Substructure: Base, Business, and Lux.
But we don’t specify components configurations for BOM item configurations.
Let’s assume the following:
- The Standard Chair arms item must contain the following elements:
- Arm pad – AP1 (Flat polyurethane arm pad)
- Arm bracket – AAB1 (Adjustable arm bracket)
- The Extended Chair arms item must contain the following elements:
- Arm pad – AP2 (“Z” polyurethane arm pad)
- Arm bracket – AAB3 (Adjustable trigger arm bracket).
- The Base Substructure item must contain the following elements:
- Chair base – Highrise alloy
- Castor – Standard
- Without Task chair control
- The Business Substructure item must contain the following elements:
- Chair base – Highrise alloy
- Castor – Standard
- Task chair control – STENO04 (steno lever lock)
- The Lux Substructure item must contain the following elements:
- Chair base – Alloy base
- Castor – Chrome hooded
- Task chair control – STENO22 (steno reflex control)
Perform BOM item configuration yourself.
Summary
You can download the demo file with the resulting data.
In this training lesson, we have studied the following:
- How to create a BOM item. What the difference is between an ordinary item and a BOM item.
- How to create a BOM.
- How a BOM can be configured. What an Item configuration and a BOM configuration are.
- Hot to set up relations between a BOM item and a BOM. What a BOM version is used for.
- How to create a sales order for the BOM item with specific configuration.
- Configure a BOM item in a sales order manually.
In the next training lesson, we will study Routes.
hi
thanks for your publish. but i have problem after creating of BOM how to separate then agin if i need to dekitting? kinldy let me know. am waiting for your reply as soon as possible.
Very informative
How to generate an *.xls file of the Bill Of Material (All Levels) from Dynamics AX 2009 ?
How to use different quantity of items in different version of a single Bom.
Hi
Thanks for giving the detail session on BOM in AX 2009,
Kindly share the same in AX2012
Regards
PS
Hi dynamicsaxtraining thanks for your kind infirmation