Agenda
- Introduction
- How to post the packing slip
- Shipping carrier interface
- Post the packing slip
- Analyze Result
- Summary
Introduction
Hi! In this training lesson, we are going through the packing slip posting process.
The following are the results of the packing slip posting process:
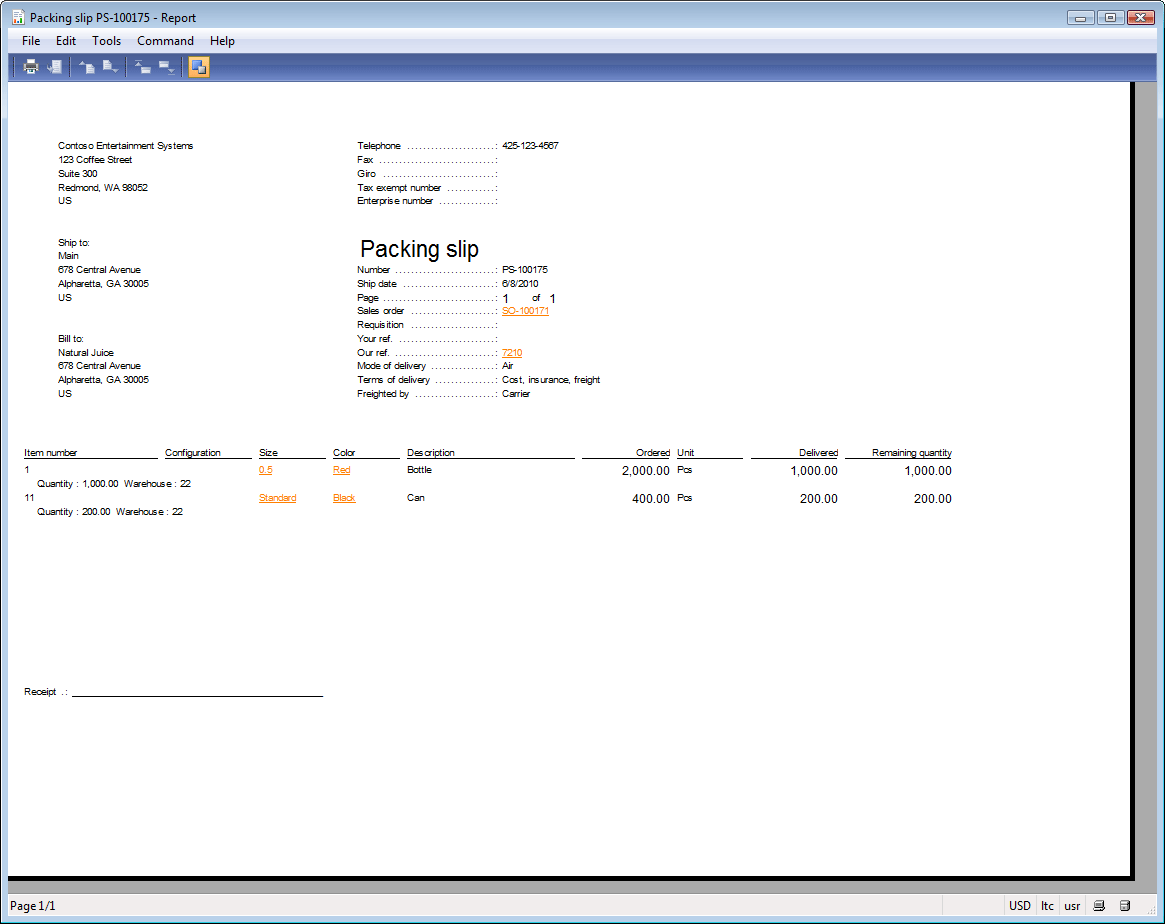
- Packing slip document is printed.
- Item is taken from the warehouse.
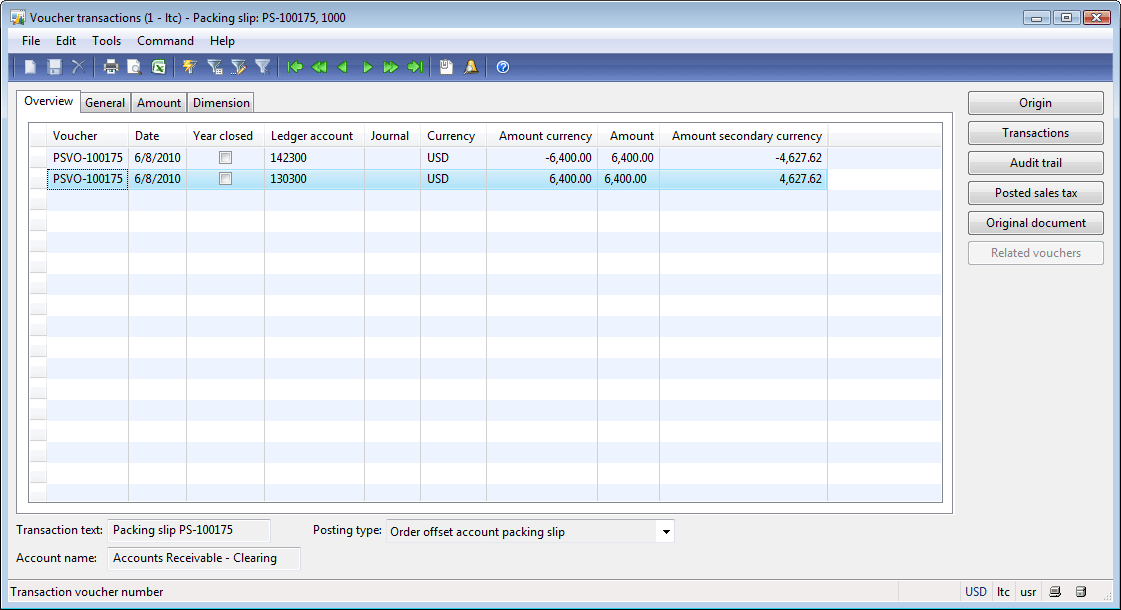
- If the company uses general ledger accounts to track customer’s un-invoiced (packing slip) balance, ledger transactions are created. One general ledger transaction relates to the Customer’s transaction and another one relates to inventory transactions.
Before leaving the warehouse, the truck driver goes to the Sales Manager and takes the Packing slip document. This document is sent to the Customer with the items. When the Customer receives items, he or she signs the packing slip document. The Packing slip is a guarantee that the Customer receives items.
How to post the packing slip
To post the packing slip, the Sales Manager performs the following operations:
- Open the Sales order form and find the created sales order (Accounts receivable > Common Forms > Sales order details).
- Click the Posting > Packing slip menu button. The Posting packing slip form opens.
Note that under the Posting menu button, the Posting picking list registration menu button is available. Microsoft Dynamics AX has another flow for picking items from the warehouse with the help of the Posting picking list and Posting picking list registration forms. But, we have studied a more complex flow in the shipment training lesson.
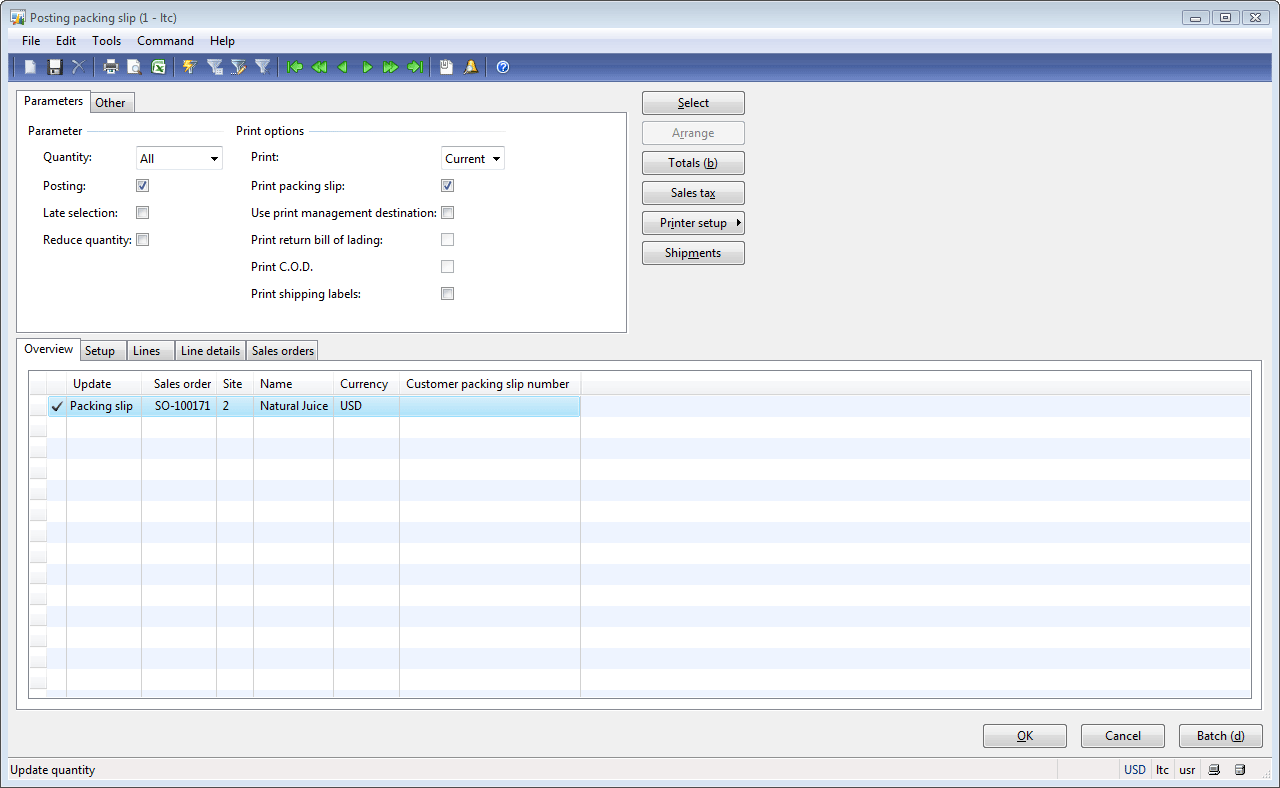
The Posting packing slip form has the following view:
In the field guide, you can find detailed field description almost about all fields from the Posting packing slip form. Note that, in the field guide, the Posting packing slip form from the Accounts payable module is described.
All information in the form is filled in by default. The Quantity field contains the Picked value. You can check that the Lines tab contains two lines and the line quantity is correct. To post and print the packing slip, the Sales Manager selects the Print packing slip check box and clicks the OK button. (Don’t do this right now). We will complicate the task. Close the Packing slip form.
Shipping carrier interface
Let’s assume that our Company uses a carrier to ship items to the Customer. The Carrier is an independent company. The Carrier has the price list that contains prices for shipping different types of goods and weights. Each time items are shipped to the Customer, we must pay specific amount of money for the carrier service (according to the price list). Our company charges the Customer with the amount of money for the Carrier’s service. In other words, we include it into the Invoice. And when we receive payment for the invoice amount, we send the money to the Carrier.
Our company selects the UPS shipping company to perform carrier functions. When the Sales Manager posts the Packing slip, the information about the items to be shipped is transferred to the UPS. UPS calculates the price and sends it back to our Company. The interaction between the Company and the UPS is performed via the Web service. The charges are stored in Microsoft Dynamics AX. When the Sales Manager posts the Invoice, the carrier charges are included into the total invoice amount as miscellaneous charges.
Set Up Carrier
To set up a Carrier, we must fill in the information in the Carrier interface, Carrier company, and Carrier forms. Let’s understand what these forms are used for.
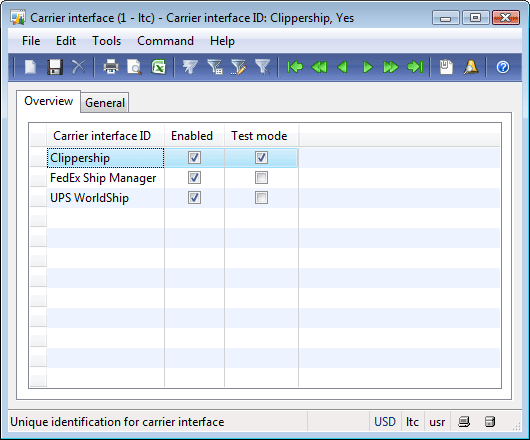
Carrier Interface form. The Carrier interface form allows you to activate/deactivate a carrier.
- Go to Inventory management > Setup > Shipping carrier > Carrier interface. The Carrier interface form opens.
In Microsoft Dynamics AX 2009, it is impossible to add a new carrier interface, but it seems that we already have the UPS interface in the grid.
- Select the Test mode check box for the UPS WorldShip interface since we don’t have an account on the https://www.ups.com site. We will enter charges for the carrier service manually when posting the packing slip.
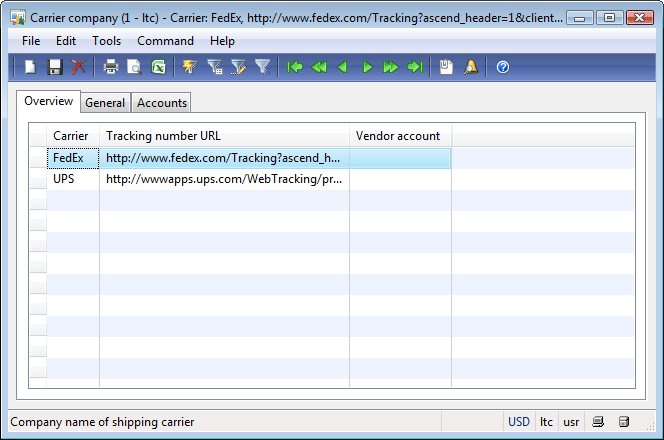
Carrier Company form. The Carrier Company form is used to define additional setup options for the carrier interface in your company.
- Go to Inventory management > Setup > Shipping carrier > Carrier company. The Carrier company form opens.
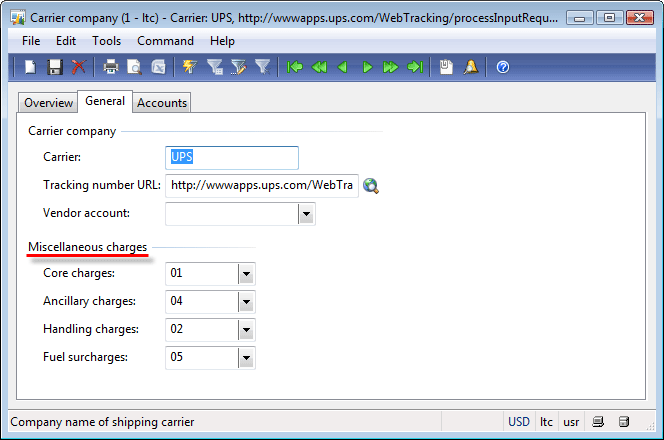
- Our demo data already contains additional setup for the UPS Company. Since we use the Test mode, only the miscellaneous charges accounts from the General tab will be taken into account.
We can see that all charges are specified for the UPS carrier.
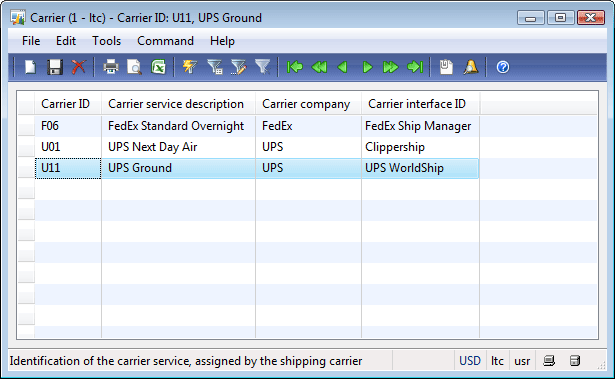
Carrier form. The Carrier form is used to associate the Carrier company with the Carrier interface.
- Go to Inventory management > Setup > Shipping carrier > Carrier IDs. The Carrier form opens.
- We will use the U11 carrier ID.
We have set up the Carrier. What will be next? How is the Carrier associated with the Sales order? The Carrier is associated with the Sales order via the mode of delivery. Remember that in this training lesson we have set up the 10 (Truck) mode of delivery.
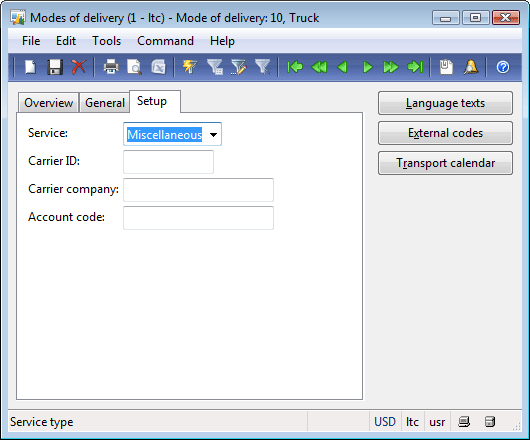
Let’s check the 10 (Truck) mode of delivery settings:
- Go to Accounts receivable > Setup > Distribution > Modes of delivery. The Modes of delivery form opens.
- Find mode of delivery 10.
- Click the Setup tab.
- We can see that the Carrier ID field is empty and not editable. The Carrier ID field is editable when the Service type is either Ground or Air.
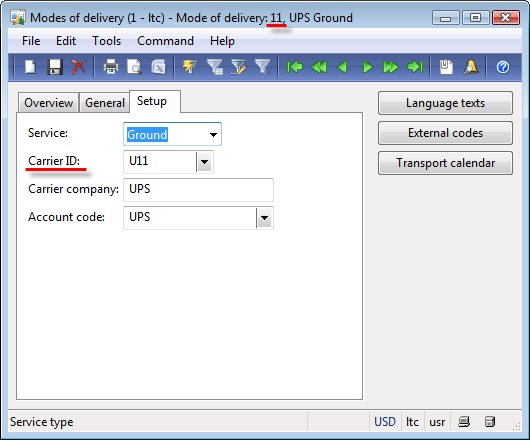
Our demo data already contains a delivery mode that is assigned to the U11 carrier. It is the 11 (UPS Ground) mode of delivery.
Set New Delivery Mode
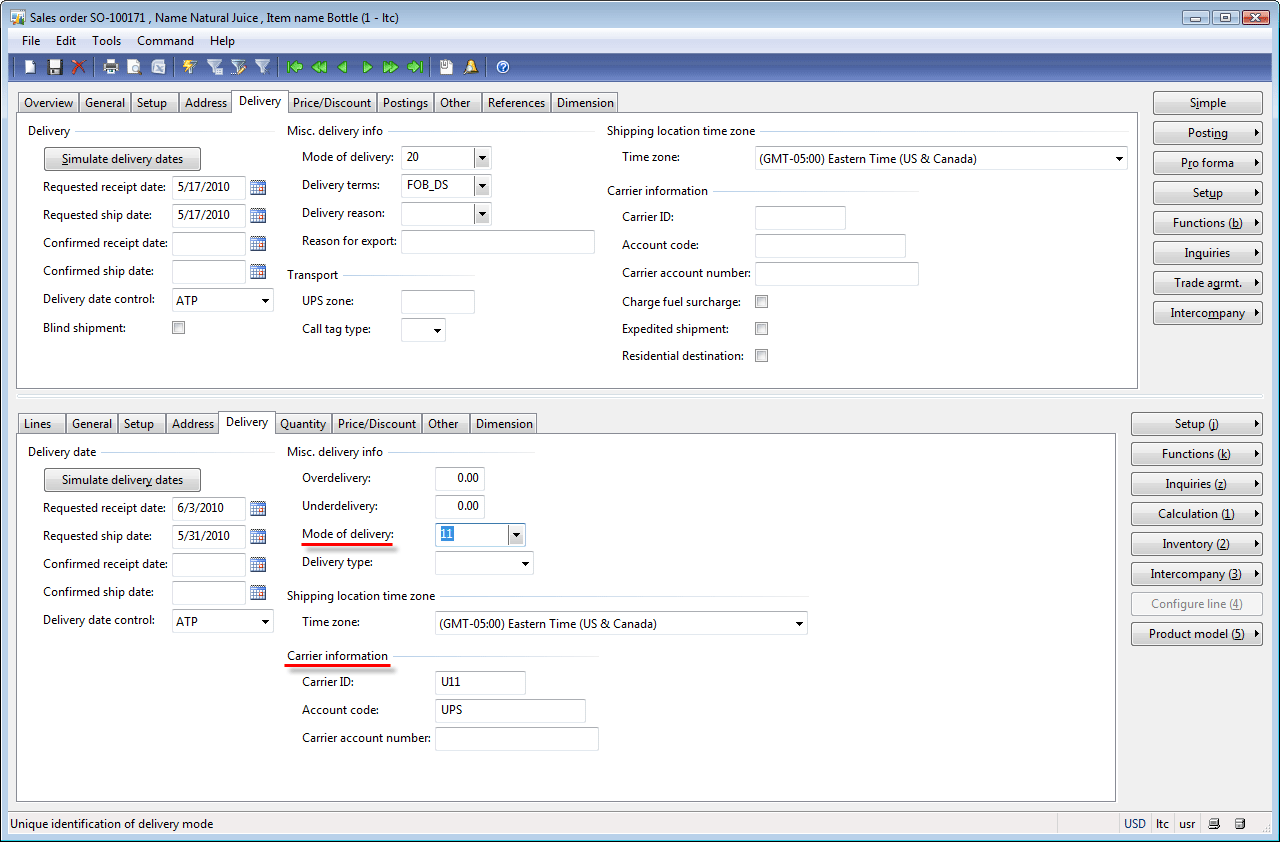
Set up the 11 delivery mode on the sales order lines:
- Go to Accounts receivable > Common Forms > Sales order details. The Sales order form opens.
- Find our sales order.
- In the line area, click the Delivery tab and locate the Misc. delivery info field group.
- Select 11 in the Mode of delivery field.
- Note that the Carrier information is filled in automatically.
- Save the order information by pressing CTRL + S.
- If you created the Sales order one week ago, the “Delivery date control is disregarded because the receipt date 5/17/2010 is before today” message appears. Just close this infolog.
Perform the same steps for the Can item.
Set New Term of Delivery
We have already set up the new mode of delivery. According to this mode of delivery, UPS is our carrier and the following charges will be calculated:
- Core charges
- Ancillary charges
- Handling charges
- Fuel surcharges
We haven’t set up our Company to pay these charges. And, UPS can take charges either from our Company or from the Customer.
If our Company pays the charges, the Company can negotiate with the UPS shipping company what charges will be paid. For example, for some reason the company doesn’t pay the handling charges.
All these requirements are set up in the Terms of delivery form.
Remember that in the previous training lesson, we set up the FOB_DS delivery term for the Sales order.
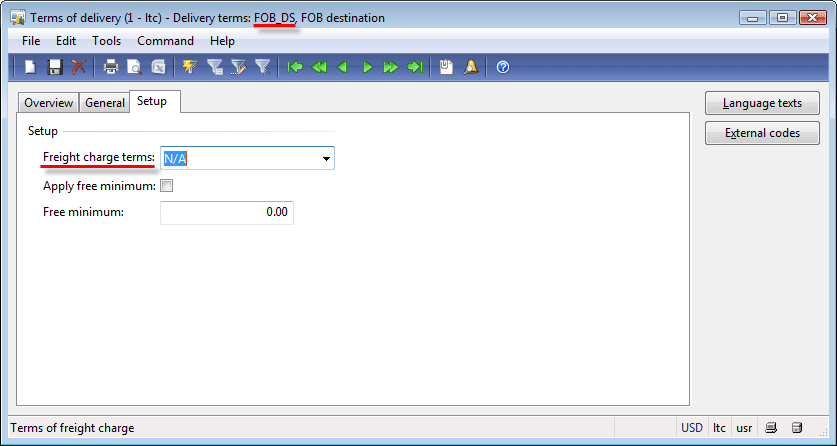
Let’s check the FOB_DS parameters (what charges our company will pay). Go to Accounts receivable > Setup > Distribution > Terms of delivery > find the FOB_DS delivery term > Setup tab > Freight charge terms field.
We can see that the company doesn’t pay any charges. It means that the company doesn’t care about the carrier charges at all. It becomes possible when the Customer pays for the carrier service himself or herself. Or when the Company doesn’t use the carrier and the Customer uses her or his own transport to deliver the items or the Company delivers the items but includes the delivery cost in the item price.
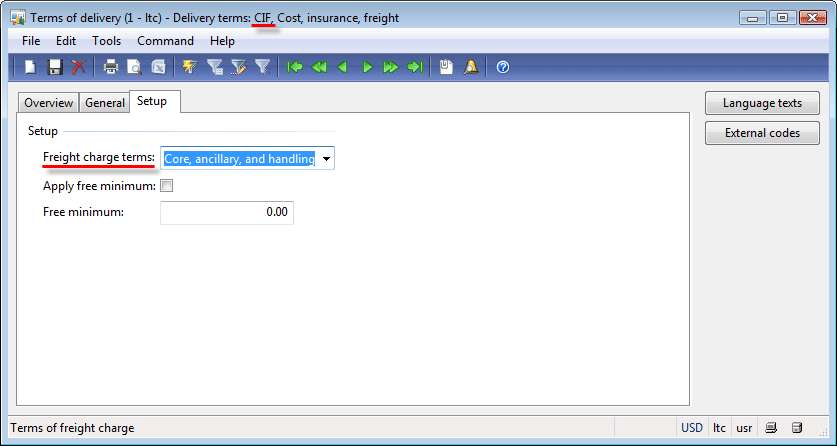
Since we assume that the Company pays all carrier charges, this term of delivery is not relevant for our situation. Our demo data already contains relevant terms of delivery – CIF.
The CIF term of delivery has the following setup:
According to this setup, our Company will pay the core, ancillary, and handling charges to the carrier. The fuel surcharge is set up directly in the Sales order form (Sales order form > Delivery tab > Charge fuel surcharge check box).
The Company can pay its own money as charges or include the charges into the invoice total amount. The Company can negotiate it with each Customer separately. We assume that the Company will include the charges into the invoice total amount.
The charge accounts answer the questions about the money source – the Customer or the Company.
The Carrier company form contains the setup of the carrier charge accounts. (Inventory management > Setup > Shipping carrier > Carrier company > General tab > Miscellaneous charges field group).
Let’s open the 01 charge account:
- Go to Accounts receivable > Setup > Misc. charges > Misc. charges code. The Misc. charges code form opens.
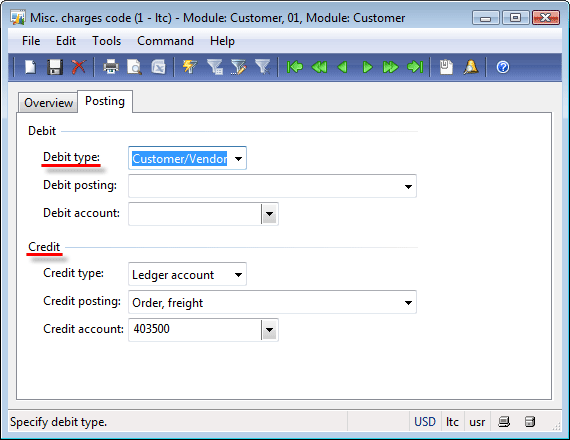
- Select the 01 charge and go to the Posting tab.
The Debit type field is the “source” of money, the Credit type field is the “destination”. In the previous form, we can see that the source is the Customer and the destination is the general ledger account. The general ledger account is used to track the income from the customer that must be paid to the Carrier (i.e. to track the charge amount paid by the Customer).
Other charge accounts from the UPS shipping company also have the Debit type field set to Customer/Vendor.
So our Company collects charges from the Customer and pays them to the Carrier. That is exactly what is required.
Let’s set up the new CIF term of delivery for the Sales order:
- Open the Sales order form. Find our sales order.
- Go to the Delivery tab.
- Under the Misc. delivery info field group, find the Delivery terms field.
- Change the value from FOB_DS to CIF.
- Save the sales order.
Post the Packing Slip
After setting up the Shipping carrier interface, we can post the packing slip.
We don’t set up weigh and volume for the Bottle/Can item. So, our package has zero volume and weight. The item setup is located under Inventory management > Common Forms > Item details > find the Bottle/Can item > Setup tab > Item data and Physical dimensions field groups.
But, since we work in the test mode, we can set any charges even for the zero weight package:
- Open the Sales order form and find our sales order.
- Click Posting > Packing slip menu button in the Sales order form. The Posting packing slip form opens.
- Select Picked in the Quantity field under the Parameter field group.
- Select the Print packing slip check box.
- Make sure that two lines are available on the Lines tab and the Quantity field contains the correct value (1000 for the Bottle item and 200 for the Can item).
- Post the packing slip. Click the OK button.
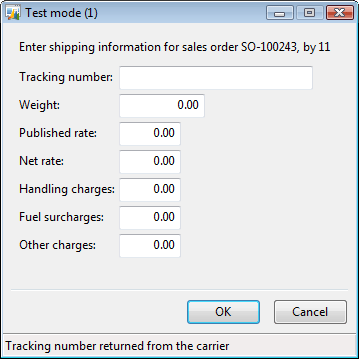
- Since the Test mode is used, the Test mode form opens.
- Enter 400 in the Publish rate field. These are the Core charges.
- Enter 30 in the Handling charges field.
- Enter 270 in the Fuel charges field.
- Enter 105 in the Other charges field. These are the ancillary charges.
- Click the OK button.
The information entered in the Test mode form will be used during invoicing. The Test mode form simulates the charges received from the Carrier web service.
Analyze Result
Now, we will check the result of the packing slip posting process:
- Packing slip document is printed. This document will be sent to the Customer with the items.
- The item is deducted from inventory. The item issue status is changed from Picked to Deducted.
- In the line area of the Sales order form, click Inventory > Transactions menu button. The Transactions form opens.
- Make sure that the Issue field contains the Deducted value.
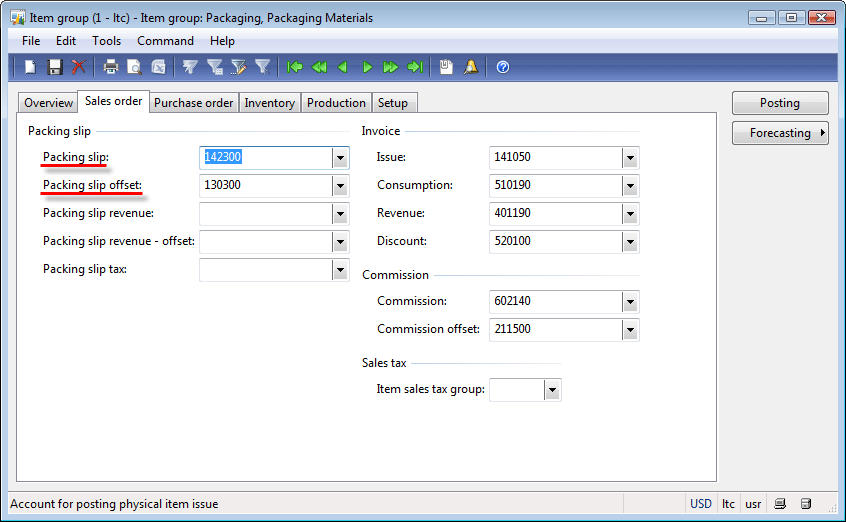
- General ledger transactions are generated because the Bottle/Can item belongs to the FIFO inventory model group. This inventory model group requires posting packing slip transactions to the general ledger accounts (Inventory management > Setup > Inventory > Inventory model groups > select the FIFO record > Setup tab > Post physical inventory check box). General ledger accounts are taken from the item group (Inventory management > Setup > Item groups > select Packaging item group (because the Bottle and Can items belong to it) > Sales order tab > Packing slip and Packing slip offset fields).
Let’s check:
- In the header area of the Sales order form, click Inquiries > Packing slip. The Packing slip journal form opens.
- Click the Voucher button. The Voucher transactions form opens. This form contains transactions generated during the packing slip update process.
- Carrier charges are recorded in the system:
- In the header of the Sales order form, click Inquiries > Packing slip. The Packing slip journal form opens.
- Go to the Order tracking tab and find the necessary information.
Summary
In this training lesson we have performed the following:
- Have gone through the steps required to post the packing slip
- Have set up the shipping carrier interface
- Have posted the packing slip
- Have analyzed the results
I recommend that you read the white paper about the Shipping carrier interface.
In the next training lesson, we will post the Invoice and analyze the results. We will see that carrier charges are added to the invoice as miscellaneous charges.
Hi,
Really appreciate your training.
May I know how to handle freight charge in transfer order?
we are using Transfer order to transfer goods to oversea warehouse, we would like to monitor the freight charge for every transfer order.
regards
shen shu ming
Hi
I’m trying to automate PACKING SLIP & INVOICE POSTING sequentially through X++ code.
When i do it manually,
1. Posting >> Packing Slip
2. Click “Ok” button in “Test mode” form
3. Status changed to “Delivered”.
4.Posting >> Invoice, once its done the status changed to “Invoiced”
But if i want to do it automatically, How do i close the “Test mode” form.
Or is there any way to get rid of the “Test mode” form
I would appreciate if would guide me on this
Thanks
Jaffar
Here is my code….
public static str60 shipSalesOrder(str salesId)
{
SalesFormLetter clsSalesFormLetter;
SalesTable tSalesTable;
str ret=”;
System.Exception err;
;
try
{
//Get SalesTable
tSalesTable = SalesTable::find(salesId);
//Packing Slip update
clsSalesFormLetter = SalesFormLetter::construct(DocumentStatus::PackingSlip);
clsSalesFormLetter.update(tSalesTable,systemDateGet(),SalesUpdate::All,AccountOrder::None,NoYes::No,NoYes::No);
clsSalesFormLetter.checkCloseDialog(clsSalesFormLetter);
//Invoice update
clsSalesFormLetter = SalesFormLetter::construct(DocumentStatus::Invoice);
clsSalesFormLetter.update(tSalesTable,systemDateGet(),SalesUpdate::PackingSlip,AccountOrder::None,NoYes::No,NoYes::No);
clsSalesFormLetter= null;
ret = ‘OK’;
return ret;
}
catch (Exception::CLRError)
{
err = CLRInterop::getLastException();
ret = err.ToString();
return ret;
}
}
How do you prevent a periodic invoice update running for updating the sales order before charges have been applied? I don’t see any field updates on the Sales Order or even the packingslip forms
SO entered
SO processed and packingslip
Data available for carrier program
[A*]Carrier program processes and send info back
Invoice update (how do we ensure [A*] has been completed?
Very useful guide, thanks.
Only one question: how can set the ledger accounts to track customer’s un-invoiced (packing slip) balance?